Compatibility Guarantee - All Media Transferred Local

Photo Scaninning

Photo
Scanning

Slide Scaninning

Slide Scanning

Negative Scanning

Negative Scanning

Video Transfer

Video Tape Transfer

Film Transfer

Film
Transfer

Audio Transfer

Audio Transfer

Slideshows

Celebration
Videos

Latest Posts

How Many Slides and Negatives Fit on a DVD?

When working on a large project, including huge quantities of slide scanning and negative scanning projects, it’s a good idea to know roughly how many images you can fit on a DVD. This way, you can better plan your discs out and include only the images you’d like on each DVD, without the worry of potentially running out of space.

The chart below will show you the resulting pixel and file sizes from your slide and negative scanning, as well as the max print size you can create from your scans.

Output Output Output Max Print Size Max Print Size Max Print Size
Format 2000 DPI 3000 DPI 4000 DPI 2000 DPI 3000 DPI 4000 DPI
35mm 1400×2500 2550×3750 3400×5000 4×7 8×12 10×15
110 1000×1300 1500×1950 2000×2600 3×4 4×6 5×7
126 2000×2000 3000×3000 4000×4000 5×5 9×9 12×12
127 Super 2800×2800 4200×4200 5600×5600 8×8 13×13 17×17
120 Small 3200×4200 4800×6300 6400×8400 9×13 16×20 20×27
120 Large 4200×5500 6300×8250 8400×11000 13×17 21×26 27×35
3D/Disc 1500×1700 2250×2550 3000×3400 4×4 7×8 9×10

The chart below will show you the resulting file sizes from slide and negative scans at various resolutions.

File Size JPEG File Size JPEG File Size JPEG File Size TIFF File Size TIFF File Size TIFF
Format 2000 DPI 3000 DPI 4000 DPI 2000 DPI 3000 DPI 4000 DPI
35mm 6 MB 14 MB 20 MB 25 MB 30 MB 55 MB
110 2 MB 4 MB 5 MB 8 MB 9 MB 15 MB
126 6 MB 12 MB 13 MB 23 MB 26 MB 46 MB
127 Super 12 MB 23 MB 26 MB 45 MB 51 MB 90 MB
120 Small 20 MB 39 MB 44 MB 77 MB 87 MB 154 MB
120 Large 34 MB 67 MB 75 MB 133 MB 149 MB 265 MB
3D/Disc 4 MB 8 MB 9 MB 15 MB 17 MB 30 MB

The chart below with show you the number of scanned slides or negatives that fit on a standard, single-layer DVD (4.5GB).

JPEG JPEG JPEG TIFF TIFF TIFF
Format 2000 DPI 3000 DPI 4000 DPI 2000 DPI 3000 DPI 4000 DPI
35mm 740 315 175 315 145 80
110 2230 890 555 1115 495 295
126 740 340 190 370 170 95
127 Super 370 170 95 190 85 45
120 Small 220 100 55 110 50 25
120 Large 130 55 30 65 55 15
3D/Disc 1115 495 295 550 260 145

How to Make an Animated GIF of a Video File

If you’ve spent any time on the internet lately, chances are that you’ve come across an animated GIF. It’s an image file that contains multiple still-frames that play looped in a sequence. Nowadays, animated GIFs are used to convey messages or reactions that a still frame just can’t match. Plus, animated GIF images are a popular way to show off your favorite video clip without the need for a fancy web video player. Plus, they are really fun to make once you’ve transferred your own home video tapes to DVD.

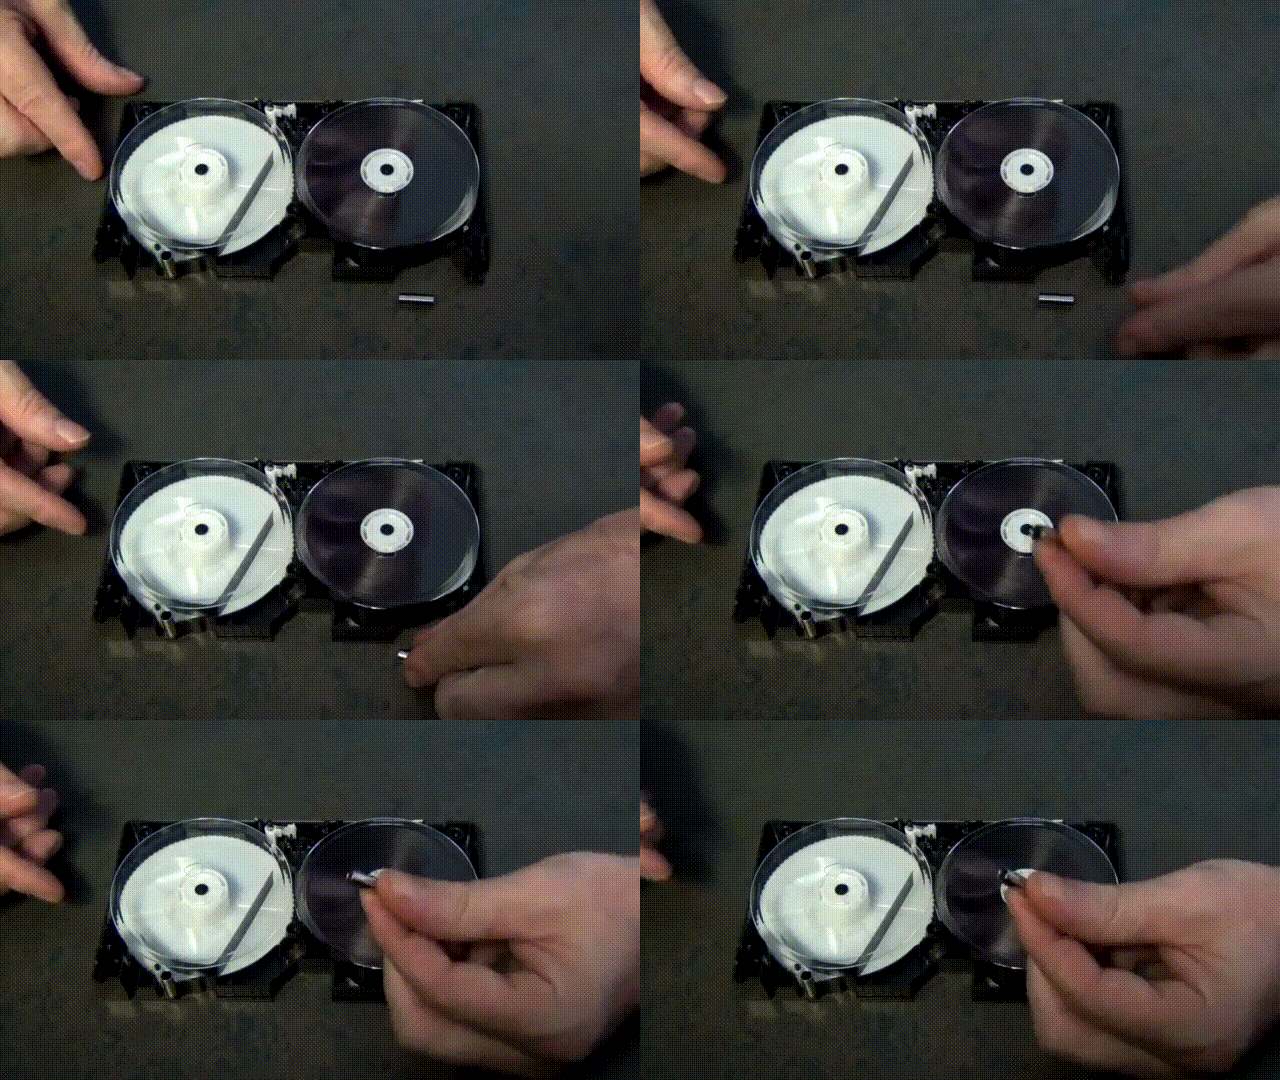
Look below for a sample of an animated GIF.

guqOXSC

At first glance you might think GIFs are complicated to make, but it’s actually the opposite… they’re actually fairly easy to make, if you know the right tools.

Photoshop Method

If you have access to Photoshop, you can have your own animated GIF created in just a few minutes.

(click here for an Adobe Photoshop Free Trial)

Step One: Find a good video sequence with which you want to make a GIF. This can be anything really, but try to go for a clip that’s not too long, as longer video generally leads to a larger file size which can lead to upload and viewing problems for users on slower connections. Ideally, you want to keep your GIF length around 3-5 seconds at most.

Step Two: Download or save the video you’ve picked to your computer’s hard drive. Check out our quick guide on how to download YouTube videos if you need some assistance with that, or check out our free guide on how to rip a DVD if you’re looking to pull a clip from one of your favorite movies. Next, make sure to crop the footage down to only the length you want the GIF to play. Remember to keep the clip under 5 seconds for best results.

Step Three: Now load the video clip you’ve selected into Photoshop. To do this, use the top navigation bar to File -> Import -> Video Frames to Layers. Select the video file you created in the previous step, and it’ll be imported into Photoshop and split into several still images or frames. You can choose to import the entire video from beginning to end, or use sliders to select a smaller portion of the clip. Limiting the frames will create a smaller file, but on the other hand, limiting frames will tend make the video more choppy.

first

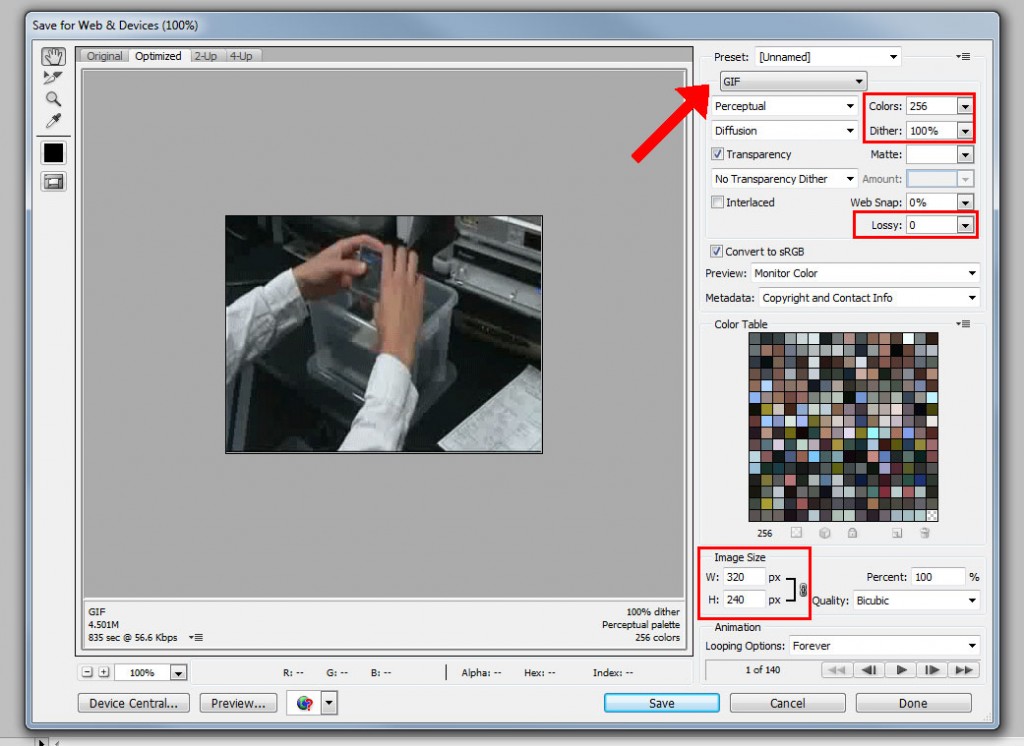
Step Four: Adjust the settings to ensure the image looks clear, and the color balance is correct. Feel free to use a slew of Photoshop touchup and effects tools if you’d like. When you’re finished, navigate to File -> Save For Web

Step Five: These next settings can be adjusted to reduce the size of your GIF. Ideally, you want to keep your GIF under 1MB, but longer GIFs may exceed this. Most people are running on broadband internet these days, so it’s not TOO big of an issue as it was years ago.

second

Step 6: When finished, simply save the GIF image, and you’re done and ready to start sharing!

Alternate Methods / Web App

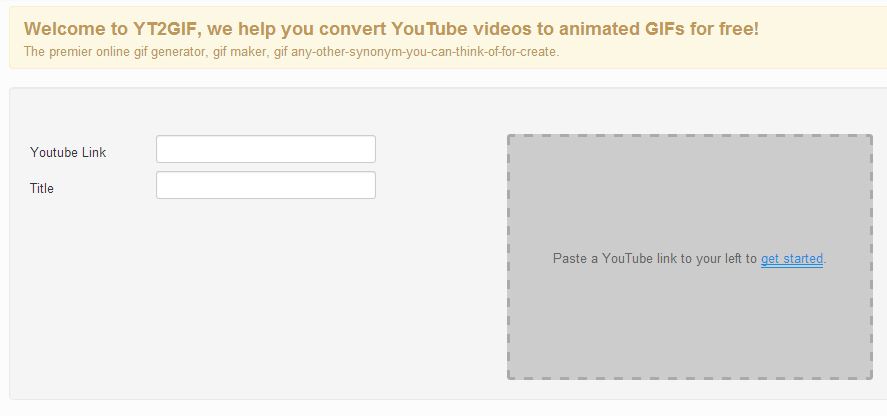
If you don’t have access to Photoshop, there are other easy alternatives you can take. For example, if you wanted to quickly make a GIF from a Youtube video, all you’d need to do is first navigate over to https://yt2gif.com/

Step one: Start the process by entering a Youtube link. Nearly valid Youtube link will work, however the video duration must be less than 10 minutes in length. Also, keep in mind the video must be viewable by a non-logged in user for this to work! Private videos will not work with this method. Also enter a title for your GIF below the link.

third

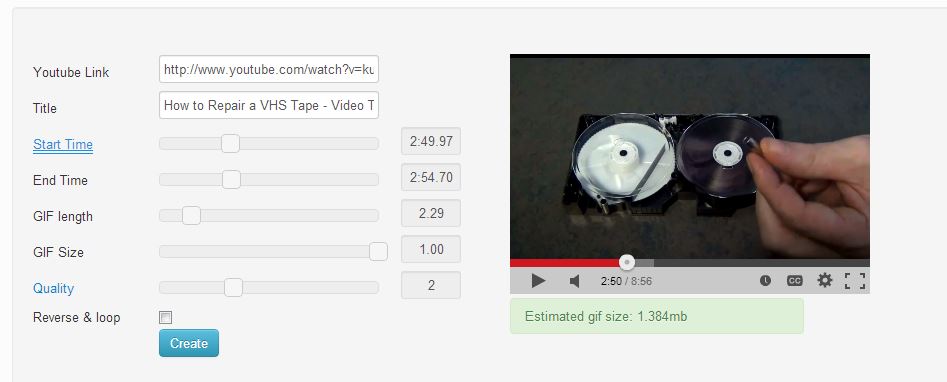
Step two: Once the link is in place, you will be granted more options for how the GIF will be created. Here you can choose precise start and stop times to ensure you capture only the footage you want. You can also adjust other variables such as the GIF length, size and overall quality… all of which will affect the resulting file size, so it’s best to be conservative in these areas to keep the file size down.

fourth

Step three: When your settings are where you want them, click “Create” and you’re all set! It will spit out a brand new GIF for you to save and start sharing around the internet.

Do you know of any easier methods? Feel free to post in the comments, we’d love to hear from you!

Transfer Videos From Your iPad to Your Computer

If there’s one thing that’s certain, it’s that mobile technology is increasing at an incredibly fast rate, now to the point where we can shoot HD video from our smartphones such as the popular iPhone or Andriod devices. However, only watching the videos from your phone is limiting at best, so many people wonder how to convert iPod or iPhone videos to another source, or how to place them on a DVD?

ipad-video

For this guide, I’ll be showing you how to transfer your videos recorded on an iPhone, iPod or iPad and transfer them to your computer running Windows. To get started you’ll need your iPhone or other device, the correct USB transfer cable (often the same cord used to charge your phone), and also the latest version of iTunes, which can be downloaded free of charge from Apple [here].

The first step to transferring your iPhone video to DVD is to connect your iPhone to your computer using the provided data cable. If this is your first time connecting your phone to your computer, it will take a few seconds for the drivers to load. If iTunes has already been installed, it should open up automatically. To transfer videos, iTunes is not necessary, but you can leave open as it will begin to sync your other files to your computer (if you have enabled that feature). For Windows users, click on your start button, then select My Computer. You should see your device showing up as a “Portable Device” drive on your computer.

Next, double click the new drive that showed up, and you will be taken into a new directory titled, “Internal Storage”. Double clicking on this will then take you to a folder called DCIM, then inside that is the directory full of all the photos and videos you’ve shot with your phone. Depending on how you use your camera, there may be thousands of images/video or just a few. Most likely, the images will all be labeled as IMG_XXXX, depending on the order of when the shot was taken, however usually a thumbnail preview will be provided. To transfer photos or videos off of the device, simply drag and drop the selected videos or photos from the phone and place them wherever you’d like.

Be default, your videos will likely be in Apple’s native MP4 format, which unfortunately is not the correct format for converting them into a DVD movie. To correct this issue, you’ll need to convert the video to an MPEG-2 format video, which you can find out how to do in the next guide, How to convert video files to MPEG2 format.

Need help? Give one of our stores a call!

We have offices that can handle iPhone video to DVD in Los Angeles, Orange County, San Diego and Denver, Colorado!

GUIDE: How to Rip a CD to MP3 Using Windows Media Player

CD Ripping or transferring your CDs to your computer’s hard drive has several advantages. For one, it allows you to make duplicate, backup copies of your favorite music as either a pieced-together mix tape, or a complete copy of the original CD. Secondly, it allows you to consolidate your entire music collection into one location on a hard drive, forever eliminating the need to shuffle through your sock drawers to find the long-lost album you’re looking for. In this guide, I’ll show you how to rip a CD for archival purposes on your computer. Once everything is indexed on your hard drive, music sorting programs like iTunes or WinAmp will easily allow you to catalog your favorite tunes.

If you’re looking for a quick guide on how to rip or transfer your audio CDs to your computer, it just might be easier than you’d thought, and can often be accomplished without buying any additional software or equipment! If you’re running a version of Windows with Windows Media Player installed, they actually include this feature right in the program.

To get started, first check that the computer you’re using comes with a optical disk drive whether that be a CD-ROM, DVD-ROM or Blu-ray player. Also check that you have the latest version of Windows Media Player. For this example, I am using Windows Media Player 12 on Window 7. If you need a new version, you can download it from Microsoft here. The great thing is that Windows Media Player is bundled right along with Windows, so there’s no need for purchasing more software or any large downloads. Once Windows Media Player is installed and opened, you’re ready to get started.

First, place the CD you’d like to rip into your CD-Rom drive. Depending on your Windows settings, the disc may start to play right away, or ask you what you’d like to do with it. Go ahead and open up Windows Media Player and navigate to the options panel by clicking Organize –> Options.

Windows Media Player Options Menu

Once you open the options panel, select the Rip Music tab at the top and you should see something similar to the image below.

how to rip CD Windows Media Player

Here you can adjust settings to fit the project you’re going for including where the ripped files will be placed, what format the ripped audio will be in and quality adjustments.

As far as the audio format choices, most of the time people will opt for the MP3 format, as it’s a great format for both saving space and keeping the quality of your music relatively high. However, they also offer lossless formats if you want to preserve the integrity of your music for archival purposes. As for the audio quality slider, you can adjust the output quality of the ripped music. Keep in mind that higher quality generally means large files, so if you’re limited with hard drive space, it might be best to not max out the quality of all of the audio.

Once everything is selected to your specifications, press apply, then hit OK. At the main window, all you need to now do is click the button that says “Rip CD”.

The resulting audio files will be placed in the directory you specified previously at the options menu. Now, just verify that the audio files play correctly and you’re done! You can use this method to rip all of your music to your hard drive for future mixes, or just for backing things up.

Photobin Closing Down – Scanning in San Diego

If you are a past or current customer of PhotoBin, and visited their website recently, you may have noticed that they are closing down… If you have been thinking about scanning your old box of photos, slides or negatives, there is no better time! DVD Your Memories is San Diego’s leading media transfer company specializing in professional image scanning services, along with film, audio and videotape transfer services to satisfy all of your media conversion needs.

By continuing to provide our outstanding service, and quality media transfers, DVD Your Memories remains the top media transfer company in San Diego! We dedicate ourselves to providing families the chance to preserve and protect their recorded memories for years to come at affordable prices. Below are some of our highlight services.

Video Tapes to DVD
Our video tape to DVD service allows you the chance to convert your old video tapes (VHS, Video8, MiniDV etc.) into an 100-year archival DVD movie that can be enjoyed by everyone on your home DVD player. One of the most popular consumer tapes from the 80s and 90s was the VHS tape. We can convert your VHS to DVD in San Diego and Irvine and we can even perform VHS repair and video restoration services as well! We do all we can in order to extract whatever data remains on damaged tapes.

Audio to CD Transfers
We can also transfer and convert your audio formats into audio CDs or MP3 files. Our expert audio technicians will inspect and clean your audio prior to transferring and make any repairs or adjustments needed. We can create custom mix CDs which incorporate audio from several sources, if needed. Our audio cassette to CD services has helped countless people hear the voices of the past once again.

Slide Scanning
Our skilled image scanning technicians have an expertly trained eye for proper colorization and image quality. We use the highest grade slide scanning equipment available, and we’re able to scan your slides up to 4000dpi to provide you with a crisp, crystal clear image that you can take wherever you go on with our slides to DVD or portable hard drive services. You’ll be amazed at how awesome your slides will look once they are digitized on our scanners.

Negative Scanning
In addition to slide scanning, we also offer our premium negative scanning services in San Diego and Irvine. We’ll scan your negatives using a high quality dedicated Nikon film scanner. Our scanning technicians are experienced in handling a wide array of formats and sizes in order to create perfect digital images from your negatives.

Photo Scanning
Just about everyone has loose photos laying around, many of them of important times in your life. We can take those photos and preserve them forvever onto our 100-year archival DVDs by taking advantage of our photo scanning services. All of your photos are scanned by hand using high quality flatbed scanners. We never use document feeders or any other automated equipment, as we manually scan each and every one of your photos, and make any adjustments necessary to provide you with the best possible scan.

8mm-16mm Film to DVD
Have old reels of 8mm, 16mm, or Super 8 film? We can take those old canisters of film and turn them into modern DVD movies! With today’s technology, we can bridge the technological gap between film and digital video in order to create a fully functional DVD movie that can be watched on any modern equipment. We also offer the option for color correction and contrast adjustment for all of your film. Forget that old projector, all you need to do is simply insert the DVD into your player, and watch the magic of our Film to DVD transfers!

Custom Slideshow Creation
Our experienced in-house editors will create the perfect slideshow for your occasion or give you their expert advice as to how to create one yourself! Think of all the times you’ve been to big parties, or nicely organized events with a custom video slideshow presentation. Maybe you wondered how to create such a beautiful video using your own personal photos, slides and negatives. Look no further, as you can now be the director of your very own movie!

Photobin may be closing down, but that does not mean that your photos need to remain unscanned! DVD Your Memories has been scanning photos, slides and negatives since 2006, and we’re really great at what we do! Our Yelp reviews should speak for themselves.

DVD Your Memories provides professional scanning services, at competitive prices. Check out our monthly newsletters and social media for new promotions and deals that could save you money on your next scanning order or video tape transfer!

Find_Us_On_Facebook

Difference Between an Edit-Ready AVI file and a Web-Ready MPEG File

When transferring videotapes as a digital files to a hard drive, you have flexibility in choosing the video format that best suits your needs. Depending on what you need the video for, choosing the right video format to use can make your life a bit easier, and save you some time.

First, since not all devices and methods are alike, it depends on the method of videotape transfer. For high quality video transfers, you’ll want to capture the video straight to a computer hard drive, using a high speed data port such as Firewire. Firewire usually is recommended for high quality DV-AVI video capturing. This method will provide you with the highest quality files, best suited for editing work and post-production. This is the type of file we provide when you opt for the Edit-Ready AVI File transfer.

However, if you do not plan on editing anything in your video, and simply want a video file that is ready to be shared with the world, transferring your file as a web-ready MPEG might be a better option. Using the raw video footage is perfectly fine, but it’s a bit overkill as it’s about 14gb per hour of video which means long upload and file transferring times. For a web-ready MPEG file, you have a few options. You can transfer the videotape to a DVD, then use the footage from the DVD to upload to various social media/file hosting sites. Another option is to capture the video directly to the computer as an MPEG file. MPEG compression is great for web-video because of the small file sizes taking advantage of portability and shorter upload times.

No matter which method you choose, you’ll be able to accomplish what you need. Doing it one way or the other will save you time and some sanity, however.

For a complete list of recommended video file types, click here!

Why Should You Transfer Your Family Media?

box-photos

You sometimes may ask yourself, “Why should I go digital?”

With today’s technology, scanning old photographs and 8mm film can be quick and easy.  We all hear about how important it is to back up all of our computer information, or transfer to CD in Orange County or San Diego with us.

The importance of backing up all your old photos is no different.  The advantages of converting photographs and film is unequaled. Fire, theft, water damage and a host of other unforeseen circumstances can ruin your photos.  Your family history, grandchildren, children, weddings, family reunions and proms can be restored and saved for years to come without the threat of being ruined or destroyed.

Once you decide to convert your photographs to DVD in San Diego, they can be backed up, saved, sent, and shared with ease and convenience. Photographs can be printed out any time. Your children can make scrap books, you can show your family’s history to your children and their children.

All you have to do is collect all your photographs and films.  There are now programs that help you convert your old photos with ease. If you save your old photos on digital media you will never have to worry about them again. They will not be lost in a box somewhere or ruined by a fire or flood.

Last year a friend of mine was asked by her daughter to send her some of photographs from college.  The photos were never seen again.  Granted, the postal service paid the monetary value of the photographs, but those pictures will never be seen again and the experience they showed will never be repeated. The photos can be lost, destroyed by water damage, fire, etc… If you preserve those photos on digital media, you never have to worry again about losing them in some kind of accident or disaster.

So, Why Go Digital?

Preserve & Protect

Once your material is digitized, it’s frozen in time. Digital files won’t degrade, allowing you to pass on your family archive in good condition for generations of enjoyment. Store an archival-grade back-up in a safe location or ask us to keep a copy of your files to protect your family history from fire, flood or other damage.

Enjoy

Now it’s easy to relive good times – just pop in your personalized DVD and enjoy! No more messing with heavy projectors or hauling boxes out of the closet. And our convenient menus with chapters allow you to jump right to the scene you have in mind.

Share

Once on DVD, you can easily share copies of favorite home movies and photographs with family and friends. Or post your new digital files online for all to enjoy. Make it an annual tradition or gift for someone special!

Organize

Digitizing your family memories allows you to organize and combine all of your photos, movies and recordings into one simple digital archive. Imagine all of those boxes of fragile memorabilia condensed onto a few well-organized discs!

Edit

With digital files, you have the ability to edit your material for any audience. Many people take their digitized images and create custom edited slideshows in Orange County or San Diego for special events. Don’t like that parade in the middle of your summer vacation footage? Take it out! Want just the highlights? That’s also able to be done. Whether you’re the do-it-yourself type or want to take advantage of a professional editor, a custom edited family video is the perfect holiday gift.

Enhance

Digital technology gives us a range of tools to enhance your material and your final production. Repair & restore aged or damaged photographs; improve the color and brightness of your home movies; clean-up the sound of old records and tapes. For production value, add music, titles & text, special effects and more. Or, for a personal touch, narrate your DVD.

1 2 3 4 44