Compatibility Guarantee - All Media Transferred Local

Photo Scaninning

Photo
Scanning

Slide Scaninning

Slide Scanning

Negative Scanning

Negative Scanning

Video Transfer

Video Tape Transfer

Film Transfer

Film
Transfer

Audio Transfer

Audio Transfer

Slideshows

Celebration
Videos

Latest Posts

Enjoying Your Old Film on DVD

Have you ever thought about converting your old 8mm film over to a digital format? Much of the film we have, hasn’t been seen for over 20-30 years and after putting the film on DVD, is perfect to bring out during a special family gathering or event. Being able to see footage of your family from 50+ years ago is an incredible experience, and it’s amazing that technology has allowed us the privilege to watch important events from the past.

Here is one example of an 8mm film transfer, taken from an amusement park. The screen has been split to show the original colors on the left, and the restored film on the right. As you can see the film had been heavily color-shifted to red/magenta.

At DVD Your Memories, we can even take your old film and restore it to it’s original colors and vibrancy. Now you can watch your film, digitized, and fully restored to it’s original quality. You can even combine your film with images from slide scanning, or photo scanning jobs as well. Watching this old footage will definitely bring a tear to your eye! This is truly a priceless service.

Types of Image Formats Used in Photo Scanning

Photo scanning isn’t the most difficult thing in the world, but it does require some first-hand knowledge before your scans will look perfect. One of the things to always keep in mind is what file type the resulting scans will be. The image formats you choose could have an impact on the final product. The most commonly seen image formats are TIFF, JPG, GIF, PNG, and BMP.

photo scanning

The main reason for all of these different file types is because of differences in file compression. Raw image files tend to be rather large, especially from high-end cameras. Larger files then lead to taking up more disk space, more bandwidth, etc. Compression is a term used to describe the ways of making the image take up less disk space, while maintaining as much of the original quality as possible. Image file types are often known as “lossy” or “lossless” compression.

TIFF – This is a image format that can either be lossy or lossless. Primarily, TIFF images are lossless, meaning having no compression and are used for image manipulation purposes. Most graphical editors support TIFF format. Due to the fact that this is generally a lossless format, TIFF files tend to be much larger in size than other formats. TIFF is great for when you need uncompressed data such as when scanning slides for archival purposes.

JPG – JPG is one of the most commonly found image types today. It is optimized for photographs and other types of applications that contain many different colors. JPG is quite popular for it’s ability to greatly compress an image while maintaining a remarkable quality. This property of JPG makes it very popular for web related use. JPG compression works by analyzing images and removing the data that the human eye wouldn’t notice is missing. Keep in mind that the degree of compression can vary from image to image. Most of the higher end photo editors will allow you to adjust the compression ratio, as well as let you see a preview, so that you can easily balance compression vs quality.

GIF – GIF compression works by creating a color table of 256 colors pulled from the image. If the image has fewer than 256 colors, GIF will show an exact copy of the image. If the image contains more than 256 colors, the software will run an algorithm to find the best colors to use for the 256 color table. GIF compression works by reducing the number of colors from potential millions down to only 256 colors. GIF compression also replaces commonly occurring patterns (especially large areas of uniform color) with a short abbreviation, which cuts down on file sizes.

PNG – PNG is an image format that employs lossless data compression. However, PNG compression looks for patterns in the image that it can use to help with compression. PNG was created to improve upon and replace GIF (Graphics Interchange Format) as an image-file format not requiring a patent license. The PNG acronym is optionally recursive, unofficially standing for PNG’s Not GIF.

BMP – BMP is short for bitmap image file, or simply bitmap which was invented by Microsoft. Currently, there is no real reason to use BMP as a standard image format as the other options offer higher quality at better compressions.

We often get asked about the different types when doing photo scanning in Los Angeles, San Diego and Irvine and hopefully this guide will help you decide which is best for you.

Using Slide Shows For Parties Or Get-Togethers

Slideshows are a wonderful way to add extra flavor to your event or get-together. Great slide shows will help keep your guests entertained with images from the past as they listen to cleverly selected music. Slideshows have actually been around for a while now, and was first popularized by using old 35mm slides, and then showing them off through a projector to your audience. Many times, music was timed with the slides for added effect. This was the standard method of slideshows for years, until technology progressed to allow us to manipulate video.

With the advent of video tapes, recorders and camcorders, slideshows found their way onto these video tape formats. Users could find that they could edit their slideshows with much more precision than before, with the added bonus of being able to sync their music up to the slides. The one drawback of this particular method was that the video tapes were of much lesser quality than a static slide or image. Due to this fact, many large events still used slide projectors all of the way up to the digital age.

When the digital age took over, the slide projectors were thrown out in favor of the much more advanced digital projectors. With digital projectors, you can simply perform a quicks slide scanning job in high resolution, and use the resulting digital image to show through the projector at the highest quality.

Need a slideshow done? Check out DVD Your Memories’ local Slide Show services below!
Slide shows Orange County
Slide shows Los Angeles
Slide shows San Diego

Company News – New Denver Location

As you may have heard, our new store in Los Angeles opened in February, and is quickly showing the Culver City residents why we’re the best media transfer company in the country! Our LA staff is working hard to provide the fantastic service and product that we’re known for. For additional news about our LA location, check out and Like the Facebook page! But now, our new Denver Location is open!

After the grand opening of the LA store, we quickly shifted gears to opening up our fourth store. The new store will be located in beautiful Denver, Colorado. This new location will help out the residents of Denver convert their old photos, slides, negatives, videos & film to DVD. Right now, we are finishing up the final arrangements and should start moving in shortly. Our newest manager, Steve, is trained and ready to showcaser the magic of converting VHS to DVD in Denver! Stay tuned for more updates…

Stay tuned for more news regarding the opening of our new Denver location!

MiniDV Tape Repair Guide – How to Repair a MiniDV Tape

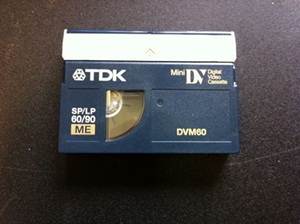
Repairing a Mini DV tape is actually not very difficult at all, once you have the right tools. In many ways, it’s very similar to the VHS tape repair and audio tape repair posts I made a while back. Although tapes can become damaged in many different ways, tape breaking is one of the most common types of damage to these miniDV tapes. In this guide, I will illustrate how to repair a Mini DV cassette with broken tape.

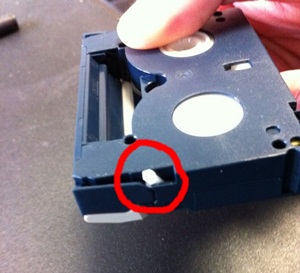
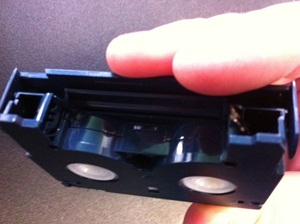
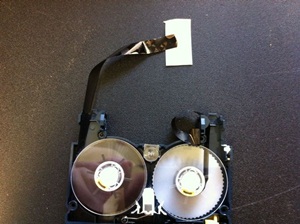
To start off, inspect the tape for what kind of damage you’ll be working with. It might be a little hard to see at first because of the small size of the tape, but an easy way to check for tape breakage is to press down the little white tab and flip the protective flap over and inspect if there is tape there. If you see no tape, then the tape has snapped and is in need of a re-splice. The tab is circled in red below. The image to the right shows that the tape is damaged, because both ends have been separated and stuck inside the casing.


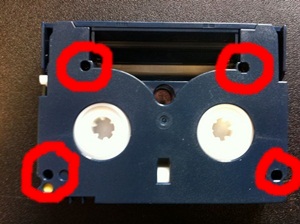
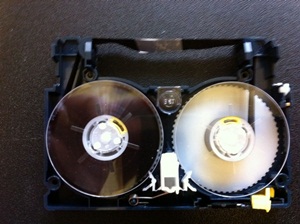
Once you’ve figured out the problem, it’s time to open up the cassette. To accomplish this you’re going to need a small screwdriver. A jeweler’s kit or tools are very helpful, as the screws for Mini DV cassettes are rather small. There are 4 screws in the cassette, check the image below for the locations.

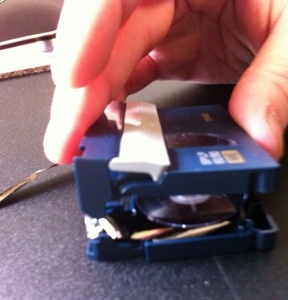
Once the four screws are out, the next step is to carefully separate the two halves. Before you start, turn the tape back over, so the front is facing you. Next, pull back the top flap and carefully separate the two using a gently rocking motion. Be sure not to force it apart, as there are tiny pieces inside which, if lost, will make the repair job much more difficult. Once separated, set the top shell off the the side for the time being, and concentrate on the side that contains the two reels of tape.

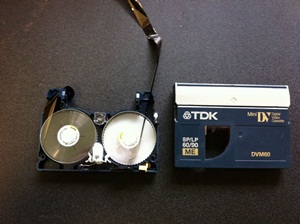
With the two sides apart, it’s now time to re-splice the broken tape. For this step, I recommend obtaining some video tape splicing tape. Scotch tape can be used as a makeshift solution, but be advised that the chemicals present in scotch tape will eat away at your video tape over time. The first thing you want to do is to pull the tape out from the reels to give you some more slack to work with. You can do this by either manually taking the reels out of the casing, or by depressing the little white tab in the middle and slowly pull the tape out.

One you have workable tape on both ends, cut a small piece of splicing tape, and place it under the exposed tape. The next step is to carefully place the other end of the tape next to the first, trying to keep it as flush as possible. This step might take a couple tries because you want to be sure the ends will not end up crooked, as this could affect the playback of the tape, or cause it to snap again. Cut off the extra tape hanging off of the sides with a sharp knife or scissors.


Place the reels back into the cassette and guide the tape back through the slots.

At this point the two reels should be joined together, and the tape ready to be reassembled. Reassembly is fairly simple, just follow the previous procedure and carefully place the top half back onto the bottom. Lifting the flap at the top will help you get it on there correctly.

Once done, ensure the tape is nestled in it’s proper place and the mechanisms appear to be working right. When it’s all done you should now be able to play this tape once again.

Splicing Film to DVD in Los Angeles… No Power? No Problem!

Well a couple days ago, the power went out at our Culver City store for a short while. After some quick investigation, we discovered that not only was our office out of power, but the entire city block was also affected by the outage. While other hundreds of other confused businesses and employees were wondering around and crowding the streets, wondering what to do, our LA team was quick adapt to the situation. We quickly re-routed the phone lines, updated the website, and got everything ready to go. Although there wasn’t too much we could do about photo scanning or video to dvd orders, the team decided to stay ahead of the game and started the prep work on future Film to DVD orders. This mainly included cleaning and splicing of 8mm and 16mm film, preparing them for our film transfer process.

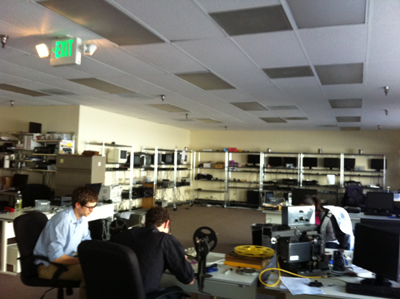
Ryan, Brian and Stephanie working through the power outage, cleaning and splicing film for an 8mm film to DVD Los Angeles order.

All in all, the workflow continues and our customer’s orders are right on track!

As you can see, a simple power outage will not impede the workflow of the DVD Your Memories! We will persevere through lack of electricity and finish our transfers, and have fun doing it! Come on down and pay a visit to our Los Angeles store!

Restore Old Negatives Using Digital ICE

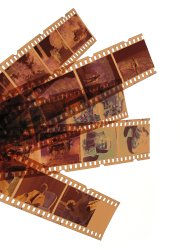
When scanning older negatives in Los Angeles, it’s rare that you’ll find one that was in absolute perfect condition and needed no restoration work. Luckily, most of the higher end negative scanning equipment comes with built-in technology to help diminish the aging effect of older negatives. This is called digital image correction and enhancement, or Digital ICE. Digital ICE technology automatically detects and removes surface defects such as dust and scratches. Keep in mind, however, that Digital ICE cannot be used for black and white negatives.

digital ice

ICE technology actually works from within the actual negative scanner, as opposed to traditional software restoration methods. The ICE technology works by using a powerful scanner with a two different light sources. One is a normal RGB lamp and the other an IR lamp. The negative scanner would then take the negatives and scan them twice, once with each lamp. The IR lamp uses a detection method to find dust particles throughout the image, and then inpainting is applied based on this data afterwards. The general idea behind it is to subtract the scratches and dust from the RGB image using the data gathered from the two scans.

Digital ICE works great for large scale 35mm negative scanning, or other projects such as slide scanning or photo scanning. projects.

1 31 32 33 34 35 44