Compatibility Guarantee - All Media Transferred Local

Photo Scaninning

Photo
Scanning

Slide Scaninning

Slide Scanning

Negative Scanning

Negative Scanning

Video Transfer

Video Tape Transfer

Film Transfer

Film
Transfer

Audio Transfer

Audio Transfer

Slideshows

Celebration
Videos

Latest Posts

Epson Printer R280 – Print Labels on Your DVDs!

Although we don’t specialize in printing at DVD Your Memories, we do use printers each day to print things like documents, invoices and even CD and DVD labels for our video to DVD and film transfer customers. For printing DVD and CD labels, we have been using an inkjet model R280 by Epson. We’ve tried a few printers in the past, but have had the most luck with the Epson model because of the ease of use, plus the quality of the finished print.

Before printing to a blank CD or DVD, it’s best to use one with a matte white surface that is suitable for printing inkjet onto. Trying to print onto a disc with a glossy surface, or a disc not made for inkjet printers could result in a mess or smudging of the ink! Also, before printing onto a disc, you’re going to want to make sure you print it correctly and accurately using a DVD printing program. Epson bundles this software with the printer, but you can also download free versions online. We actually use the program called Memorex exPressit Label Design Studio, which is a free download here: https://memorex-expressit-label-design-studio.software.informer.com/

The software is pretty easy to navigate. Once you open it, you’ll first select what type of template you want to create. They offer a few different things to choose from, but for a custom job it’s best to just start with a standard disc label.

NOTE: If you’re using alternative software, we have lots of DVD/CD, insert and other templates available in a downloadable package: Download printer template pack

DVD Printing

Once you load the template you can now add the image/text you want on the blank DVD template in the program. The program includes some text effects and basic images, but you also have the freedom to place your own images in the label instead.

The nice thing about the epson model printer is that it comes with an easy to insert DVD/CD tray for printing use. All you need to do is place the disc onto the tray and gently insert the tray into the slot, while lining up the arrows as a guide.

DVD Printing

DVD Printing

The disc will take a few moments to print, usually taking a bit longer if you include lots of color. It’s important not to touch the disc immediately after it’s finished printing because the ink will likely still be wet. (Will usually take 10-15 minutes to fully dry if using lots of ink.)

DVD Printing

How to Access and Modify the EXIF Data of Your Digital Photos

What is EXIF data?

EXIF stands for exchangeable image file format, and it’s basically extra data tacked onto your image.

Back in the old days of film cameras, you had the option of printing a data right onto the photo itself in bright orange or red lettering. This was great to let you know when the photo was taken, but also left an unsightly mark on the corner of your image. However, at the time, this was the best way to catalog your photos. Many times the cameras date was also wrong, which made it all the more frustrating. When digital cameras and smartphones came out, this all changed. No longer was the data burned onto the corner of your digital image, but rather stored behind the scenes as part of the EXIF data of your image. Limited EXIF data is also stored on digital images from scanned photos, slides and negatives.

With each and every shot you take with your digital camera, the camera records not only the date and time, but lots of other data including things like shutter speed, whether the flash was on or off, plus other settings used for the shot — even sometimes geo-location, especially if using a smartphone with GPS capabilities.

How to access and view EXIF data?

Using Windows, you could select the image in question by right clicking it and then clicking properties. From here, navigate to the details tab which presents most of the data in a small window. Alternatively, you could also upload or link to the image (if it’s hosted online) to an online EXIF viewer such as Jeffrey’s EXIF viewer.

How to modify EXIF data?

It’s not often that you’d need to edit the EXIF data of your photos, but there are times when it’s useful such as if the date or time on your camera was incorrect, or if you wanted to add additional data such as a name or other tag to help you identify it in the future. Windows is actually great and letting you edit the data right from the details window after right clicking the image and selecting properties. However, not all of the items can be edited this way, such as geo-location tags.

How to remove EXIF data? Sometimes the EXIF data of your images might reveal more than you’d think. In some cases, it may be necessary to strip the EXIF data from the image before publishing or sharing over the internet.

If you’re using Windows: Eliminating the EXIF data is easy because Windows has a built in function for it. First, right click and select “Properties” on the image you’d like to edit. Then navigate to the “details” tab. Click the blue link at the bottom that says “Remove properties and personal information”.

From here, you can either select to remove portions of the EXIF data, or all of it, which will then create a backup copy with stripped data.

If you’re using Mac: To rid your images of EXIF data on a Mac, you’re going to need to download some extra software to help you out. The best one we’ve found is a small application called SmallImage. Once the program has been installed, open up the app and drag the photos you want to clean into its window. Uncheck the “Recompress at quality” box, since we want to keep the photos in their original high quality. Then, just click “Process” and you’ll see copies of all the photos show up in their folder. If you want to replace the original photos instead of creating copies, you can just un-check the “Add Suffix” box (as shown in the above photo), and it will just replace the original photos with clean ones.

What Scanner is Best for Photos?

What Scanner is Best for Photos?

Scanning your Family Photos

If you have a large collection of family photos or photo albums, you may have considered digitizing them yourself, or hiring a company to do it for you. There’s so many options in either case that it’s often difficult to know what to do. This article aims to help you make the most informed decision possible. At DVD Your Memories, we’ve been scanning photos for nearly 15 years and have scanned millions of people’s precious memories. If you want to scan your photos yourself and have a large collection, we recommend investing in a Canoscan900F Flatbed Scanner. That’s what we use for photo scanning in our four Photo Labs in Southern California. The scanner is expensive, though, and if you want high quality photo scans it’s more than likely to make the most sense to use a photo scanning company. Quality photo scanning is a more laborious process than it’s given credit for, so really we recommend using a company anyway.

Should You Really Scan Photos?

If you’ve got a large collection of family photos in envelopes from one hour photo labs or the like, you probably also have photo negatives of the same images. Those are the originals, and even though it’ll be more expensive to scan them per image than it will be per photo, we recommend doing that instead. Here’s why.

Picking a Scanning Company

If you’ve spent any time at all looking for photo scanning services, you’ve surely come across a few companies that will scan your photos for pennies on the dollar compared to other services. Our charges start at $0.49 per photo, and there are other companies who charge a tiny fraction of that. If they’re doing the work in the US, the reason the cost is so low is they’re using document scanners for your photos. If they’re not doing the work in the US, there’s a chance they’re using actual photo scanners. However, we recommend using a scanning company that is local for you. This is why.

Document Scanners

Document scanners were originally intended to save business time, money, and cabinet space. They’d do this by providing a quick way to digitize and catalogue lots of documents. Lots of entrepreneurs saw the potential of document scanning services, and created businesses that provided the service. It’s a massive industry now, projected to have a market value in the hundreds of billions by 2029. Given the size of the industry, it was inevitable that it would branch out into other areas. As more and more people realized how much more convenient it would be to have their family photos digitized, someone had the bright idea to provide cheap, low quality photo scanning with document scanners. Document scanners scan more photos at a time much more quickly than a high quality flatbed scanner. This ushered in the era of cheap “shoebox” photo scanning. Document scanners automatically feed the next photo into the scanner once the previous one is scanned. As such, there’s no need for a human to operate the machine, manually switching the photos between scans. For a more complete explanation of how they work, check out this explanation.

Price vs Quality

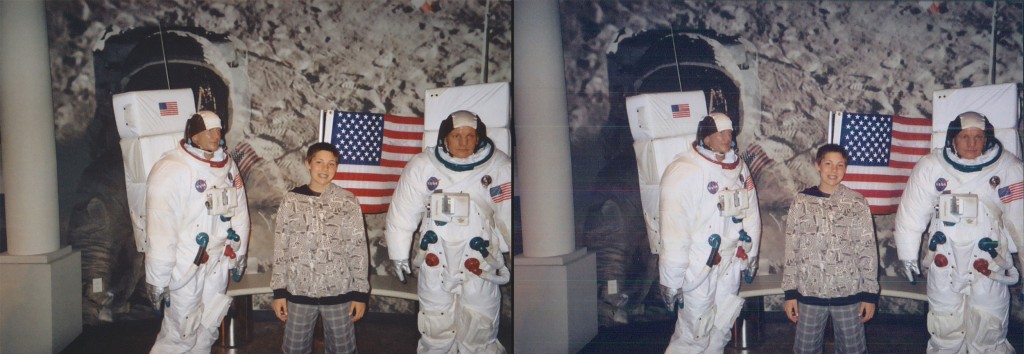
Shoebox photo scanning is certainly a great solution for a lot of people. If you just want any digital copy of your images, cheap shoebox photo scanning is 100% the way to go. However, the quality of your images isn’t going to be even close to what it would be if they were scanned by a human being operating a flatbed scanner. Take a look at the samples below and see the noticeable differences between flatbed and document photo scanning. The images on the left were scanned on a specialized Canoscan900F flatbed scanner, while the ones on the right were fed through a Kodak S1220 document scanner.

family scanned on a document scanner kid at moon landing museum scanned on a document scanner family by a box scanned on a document scanner

Issues with Document Scanners

As you can see, there is a noticeable difference in quality in the two scans. Document scanners have three main issues that do not occur with flatbed scanners:

Color Streaking

The biggest disparity between flatbed and document scanning is the streaking that happens. Particularly in the first image on the right, you’ll notice blue and green streaks running up and down the image. The reason that occurs is that the glass that holds the document picks up tiny dust particles left on your photo. Since document scanners feed the image mechanically through themselves, streaking happens all up and down the image where the dust particle came into contact with the image. That happens with flatbeds too, but since the photos remain stationary while the image sensor moves, there’s no streaking. On a document scanner, there’ll be a big vertical red line running up and down your grandmother’s body. That’s not what we consider archiving.

Faded Colors

The second problem lies in the darker areas of photos. On a high end monitor or when printing them, you’ll see a crisscross pattern of white across photos scanned on a document scanner. When the scanner feeds that image through the sensor rapidly, the sensor only has a tiny fraction of time to capture all of the data in the 24 square inches of the photo. As documents tend to be white, document scanners are designed to capture darker data on a white background. That doesn’t lend itself to quality scanning of dark photos. You’ll lose color and image data on every photo that’s fed through a document scanner, and it is often very noticeable.

Prone to Damaging Photos

The third problem is that since a document scanner works mechanically, it’s got a good chance of trapping your photo in the scanner. It might mangle the photo and destroy the image before you can get a clean scan. You’re left with no digital image and a badly damaged paper original.

Our Process for Scanning Photos

At DVD Your Memories, our photo scanning has several quality touchpoints. We recommend doing it this way if you’re doing it at home. If you’re hiring a company, check that they follow these steps, or at least something like them. For a more complete account of our process, read this. If your images are dusty (which, remember, creates scan quality problems), we use compressed air to clean them. Our technicians wear microfiber gloves so they don’t leave any fingerprints on your photos. Once your photos are cleaned, they’re carefully and manually scanned on a Canoscan900F Flatbed Scanner. Once scanned, your photos are placed back where they came from. Then, in post production, a technician will make sure your images are all rotated in the right orientations. Any white from the bed of the scanner that made it into your scan gets cropped, and if it needs it, we can do color correction. After that, we’ll do quality control on the images in post production. We redo any scans that the technician on quality control deems not up to scratch. Then, and only then, do we consider the order done.

Ellen Browning Scripps Elementary School Fall Festival

Don’t forget to check out Ellen Browning Scripps Elementary School Fall Festival in Scripps Ranch on October 19th at 5:30pm. Bring the whole family for a fun evening of games, bingo, cake walks, face painting, food vendors, teacher play date silent auction, and much more. DVD Your Memories will be donating some gift certificates good for any of our transfer services including video to DVD, image scanning and film transfer in San Diego!

Epson 10000XL: Large Format Scanner Review

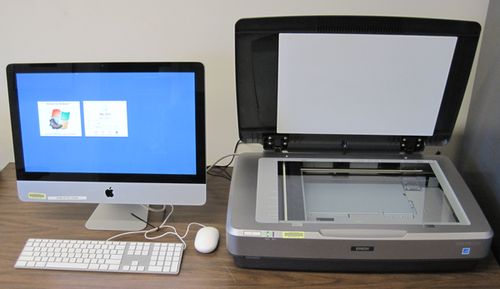
When it comes to scanning oversized photos and prints in a detailed manner, nothing comes close to the Epson 10000XL Wide-Format graphics arts scanner. Although much larger than your typical flatbed scanner, this unit can scan photos and prints sized up to 12.2 by 17.2 inches on one pass! This is great for artists and graphic illustrators who use abnormal medium sizes, but also works wonders for digital transfer and photo scanning companies to accomodate their flatbed scanners with a unit that can scan much larger than the standard 8 by 10 inch photos.

Here are some of the key features of the 10000XL:

2,400 x 4,800 optical resolution, 3.8 Dmax optical density 48-bit color depth, 16-bit grayscale; 50% to 200% zoom A3 sized scanning surface for originals up to 12.2 by 17.2 inches Adobe Photoshop Elements 2.0, MonacoEZcolor with reflective IT8 Target USB 2.0, Firewire, optional networking; PC and Mac compatible

The great thing about this scanner is it’s ability to easily stich together multiple large format works. The scanning bed itself is large and the lid lifts up smoothly, and also can be removed and replaced easily. In addition, the scan bed itself is very shallow, unlike many office scanners which have a ledge almost one-half inch deep. This is important in case you want to scan something very large and “stitch” the parts together. When the scan bed is deeply recessed, there is a visible shadow at the edges, which makes it difficult to piece together with other scans.

The bundled software also does a great job at scratch and dust removal and color enhancement. Although we use Adobe Photoshop for our image correction work, we’re confident the bundled software contains everything you need to accomplish basic image cleanup, and it’s easy to install and learn, too.

This scanner has worked great for DVD Your Memories by allowing us to easily scan LP album art for when we do LP records to CD transfers, scan scrapbooks, yearbooks or other oversized books or volumes. All in all, we highly recommend this scanner, and it’s even the same model we use to scan oversized photos and prints at a great resolution in all of our stores.

Looking for more information? Check out the 10000XL on Amazon!

Rizzoma, New Online Collaboration Tool

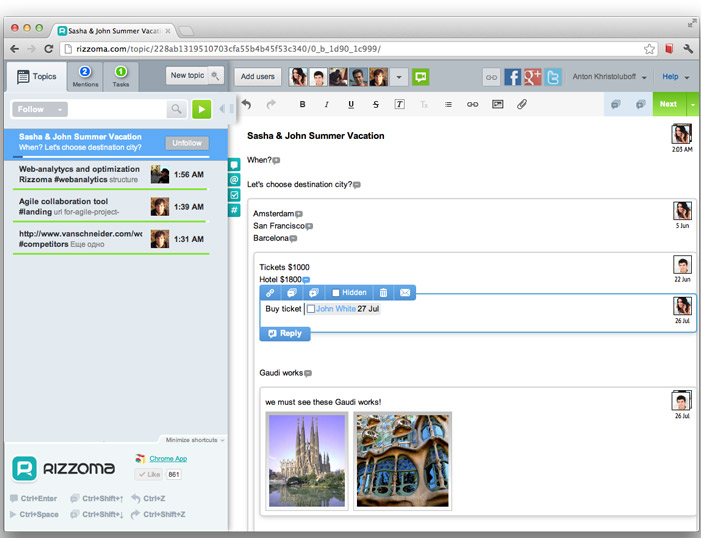
At DVD Your Memories, we often need to get many people, across many stores, involved in a discussion. Trying to schedule a meeting where everyone is free, and everyone has to be there for the entire thing, is often more trouble than it is worth. We’ve tried a lot of software solutions, in all cases the organizational qualities made contributions confusing and hard to follow. That is, until we found Rizzoma.

Rizzoma is exactly what we were looking for; it’s a space where comments and responses are well organized and intuitive, where individuals can review and comment on their own time, and all relevant information can stay, easy to access, for everyone involved without making information hard to sift through.

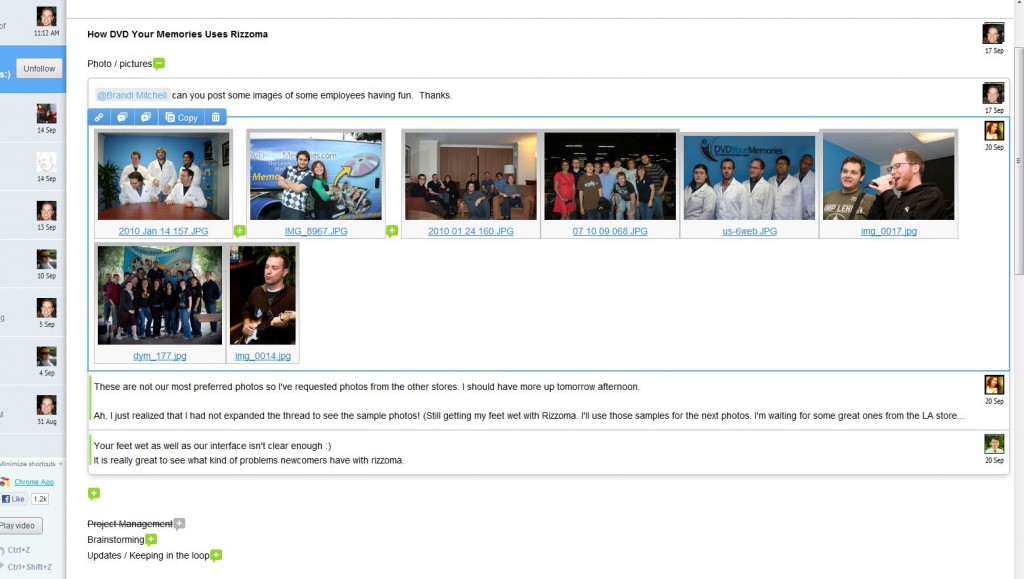
For example, several employees get together once a month to put together a “news update” for our employees, which can include announcing top sales people, upcoming company events, new technology we’re interested in (like, say… Rizzoma?), etc.. People could then comment, post photos, share, and add to the company’s history, as well as see past updates. These would get pretty long, but it was great to refer new employees to it and show them who we are, and what we get excited about. It’s a pretty good reflection of our culture.

We also have a newsletter that goes out to our customers, which typically has a theme, a promotional item, and some other interesting information about our company. Rizzoma makes brainstorming on this stuff really easy, since we just create a new topic, list basic elements, and everyone can give suggestions. People comment on what they like, what might or might not work, and likelihood of success. The staff contributes, whenever they have time over the next couple days, and then we know what direction we’re going to go with the newsletter.

Part of the brilliance of Rizzoma is that even when people are working on or adding to a topic at different times, it’s very easy to tell what they’re commenting on, as well as the fact that a new comment has been made on that topic, due to the way the information is organized. This feature alone has increased our productivity and decreased time spent in meetings, and has eliminated email chains, people asking to forward or resend responses, and conversation context being lost in all of the cross responses; All commentary, context, and relevant information is right there for all participants to see.

Frankly, we think it’s awesome. Try it out for yourself at https://www.rizzoma.com

How to Upload VHS Tapes to Youtube + Other Video Tape Formats

Youtube is a great service allowing anyone with an internet connection to upload digital videos indefinitely onto their servers to share with others. Since Youtube was developed after digital video had already gained massive popularity around the globe, it’s a bit more complicated to upload analog video sources, such as what you’d find on VHS and camcorder video tapes. However, for many of us, our most important life moments are stored away on these tapes… tapes which can be a pain to watch due to all of the extra cables and equipment you need to set up on your television just to watch. Wouldn’t it be easier if there was a way to upload VHS and all of these other tapes to Youtube and watch them any time?

The good news is that there is a way to do this, but it’s a little more complicated than uploading a video that is already in a digital format.

The first step is to gather up the video tapes you would like to upload to Youtube and find a company to tranfer the video tapes to hard drive. If you’re technically experienced, you can even perform this step yourself with a few additional items. If you’re looking for how to transfer video to hard drive, we have a couple of quick guides:
How to transfer and capture MiniDV tapes to your computer
How to capture video using Canopus ADVC110

Now, once you have a hard drive with your video files loaded on it, it’s time to upload them to Youtube. First, you’ll need to create a Youtube account (only if you don’t already have one), as you must have one in order to upload. Once the account has been created, you can begin your uploading process by clicking the “Upload” button on the top bar.

On this screen, you can either click the “Select files from your computer” button, or simply drag and drop your videos right into the window. Once selected, the video will immediately begin to upload.

As it’s uploading, you can set the title and description, as well as some additional information about your video. When the upload process is completed, your video will now be visible for the world to see!

NOTE: You can also set your videos for private viewing using the video privacy settings.

1 12 13 14 15 16 44