Compatibility Guarantee - All Media Transferred

Photo Scaninning

Photo
Scanning

Slide Scaninning

Slide Scanning

Negative Scanning

Negative Scanning

Video Transfer

Video Tape Transfer

Film Transfer

Film
Transfer

Audio Transfer

Audio Transfer

Slideshows

Celebration
Videos

Latest Posts

Make Your Own Replacement Reel to Reel Power Cord or Cable

Recently, our Orange County store misplaced a Reel to Reel Power Cord for their Teac Reel to Reel audio deck.

In the past, we had fashioned our own cables, as a quick search for a replacement reel to reel power cord or cable reveals that any site listing the model number for this particular unit wants over $35.

While $35 isn’t going to break the bank here, we try to save money when we can so we can keep our prices low. In the past, our equipment manager Bryan modified some extension cords for this use, but this typically requires a trip to Frys. Let’s be honest, if we let him go to Fry’s, we may have to send in a search party to get him back out again. So after some looking around, we found a nice power cord on Amazon. You can get the same one through this link here: Prime HC100608 8-Feet Iron Heater and Appliance Extension Cord, Black

The key thing about this model is that it fits nicely into the opening of the reel to reel deck. There will only be a slight modification needed to make it fit right, so if you shave off the little tabs on either side with a sharp knife or razor like this:

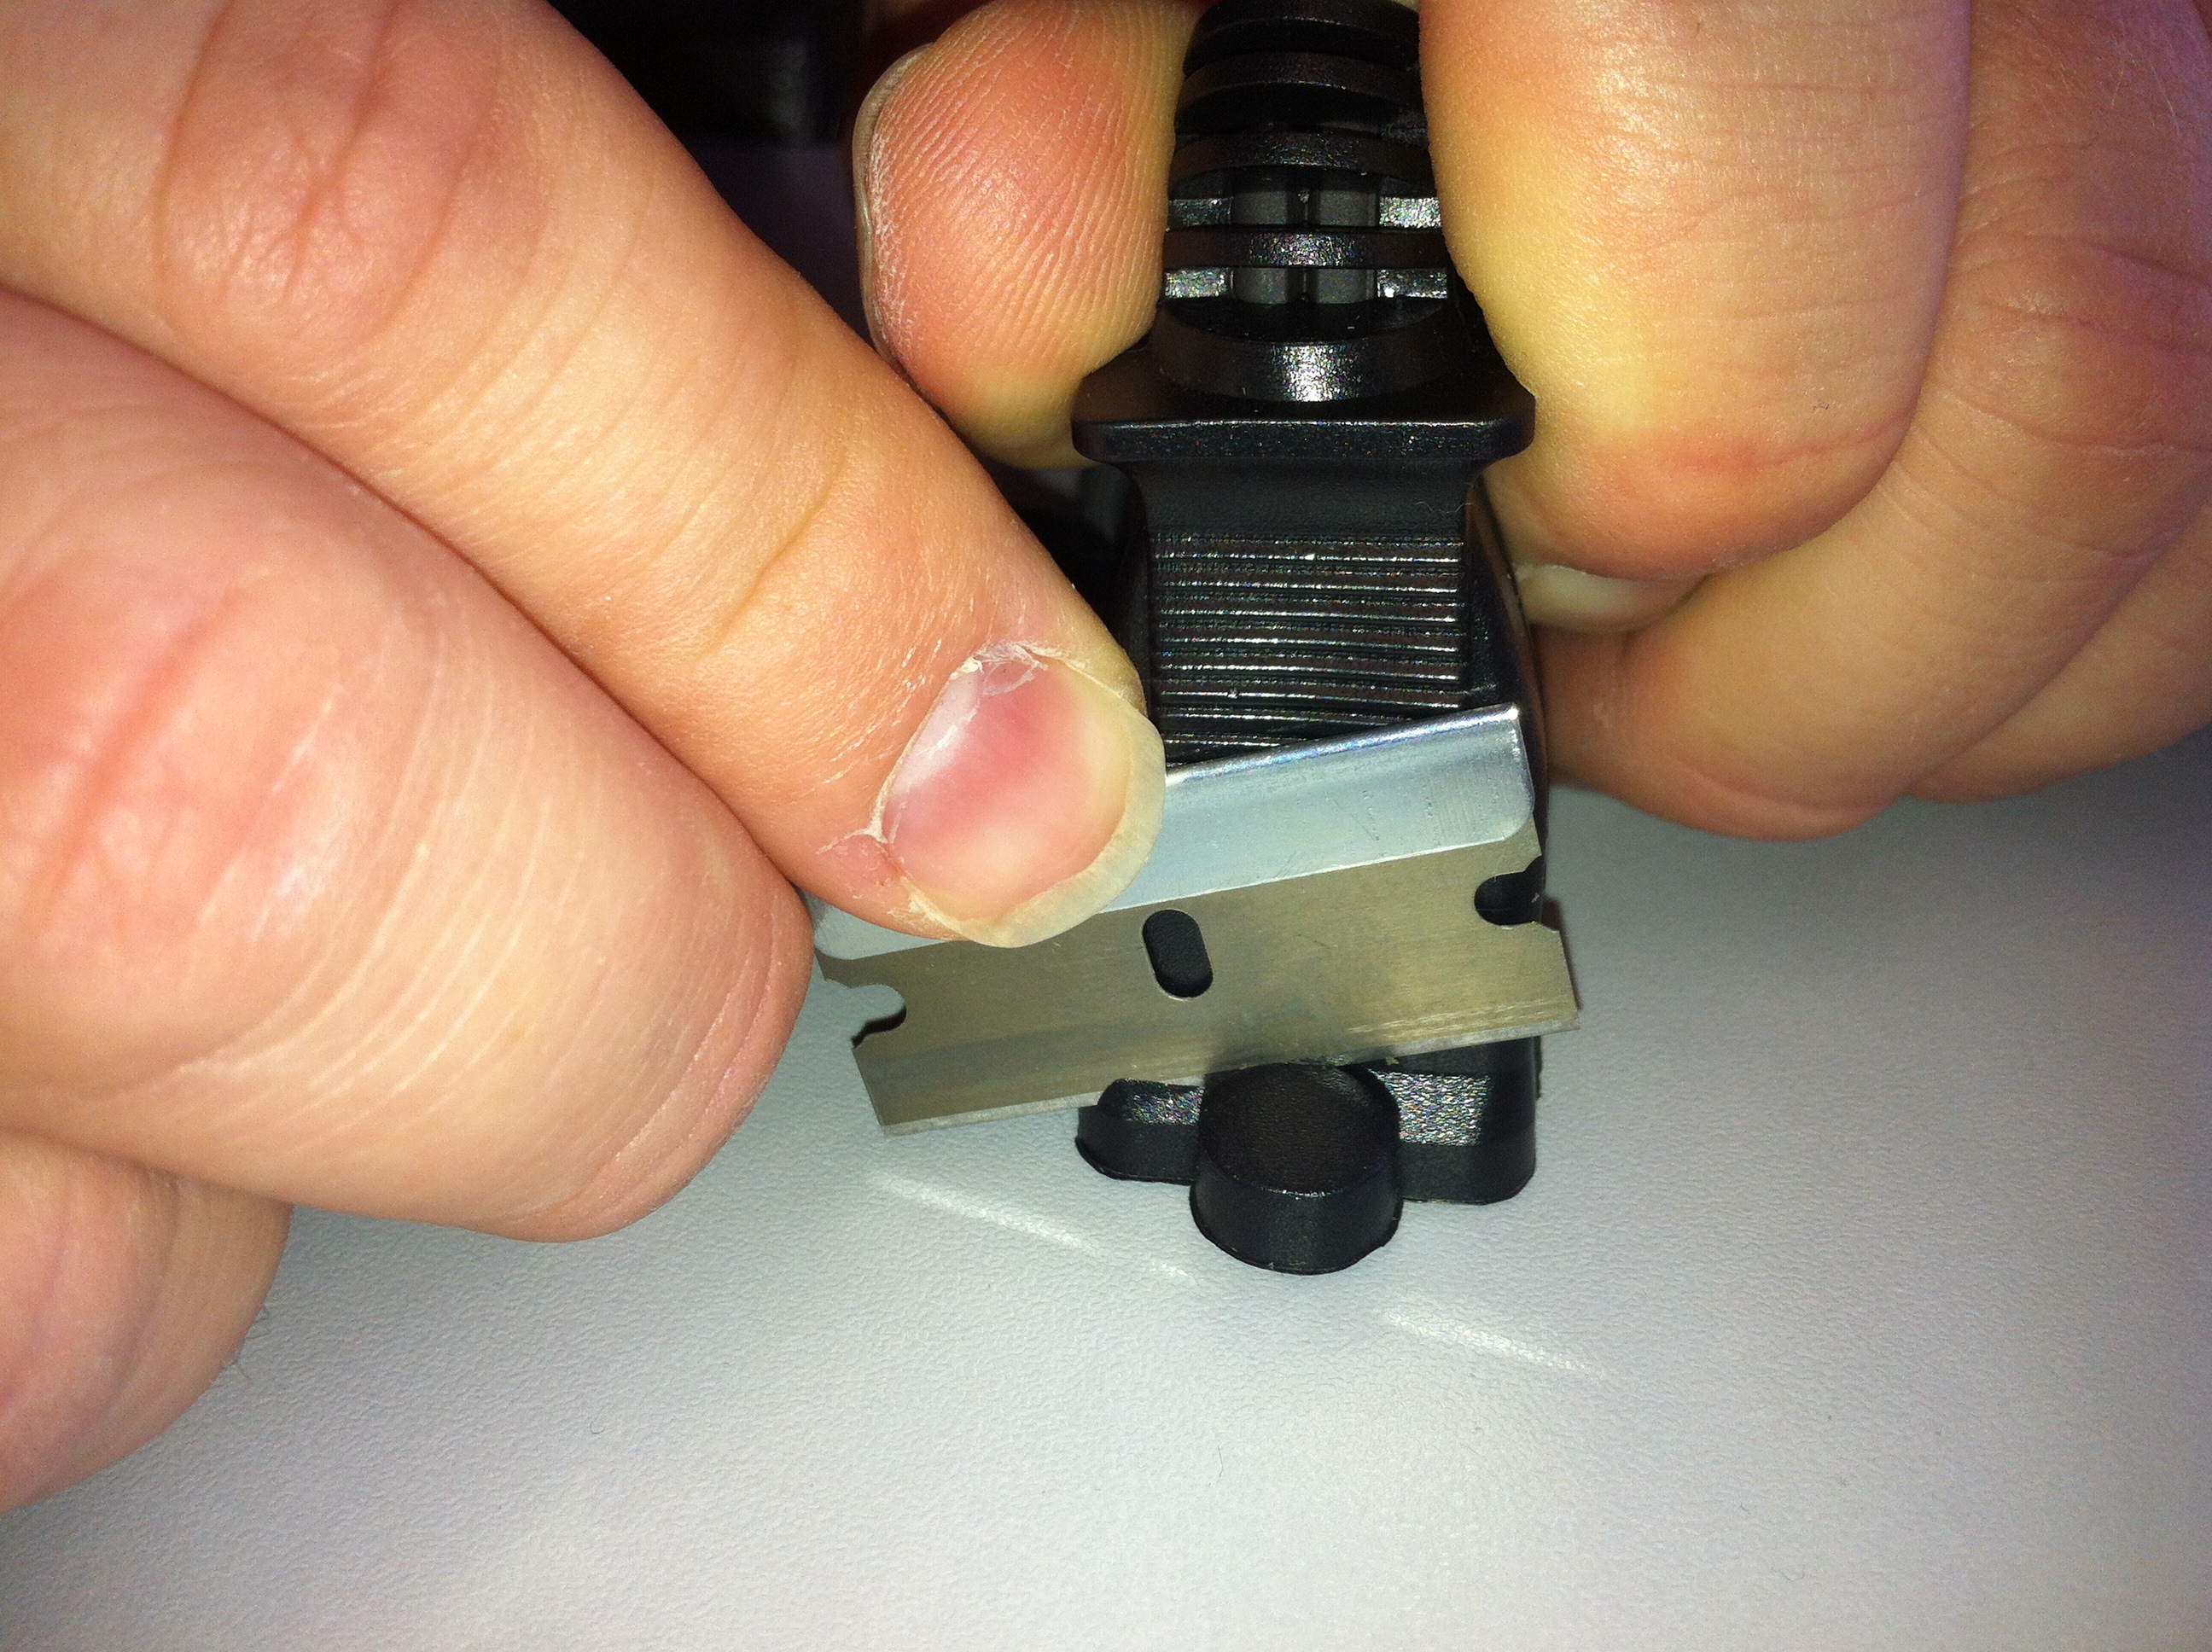
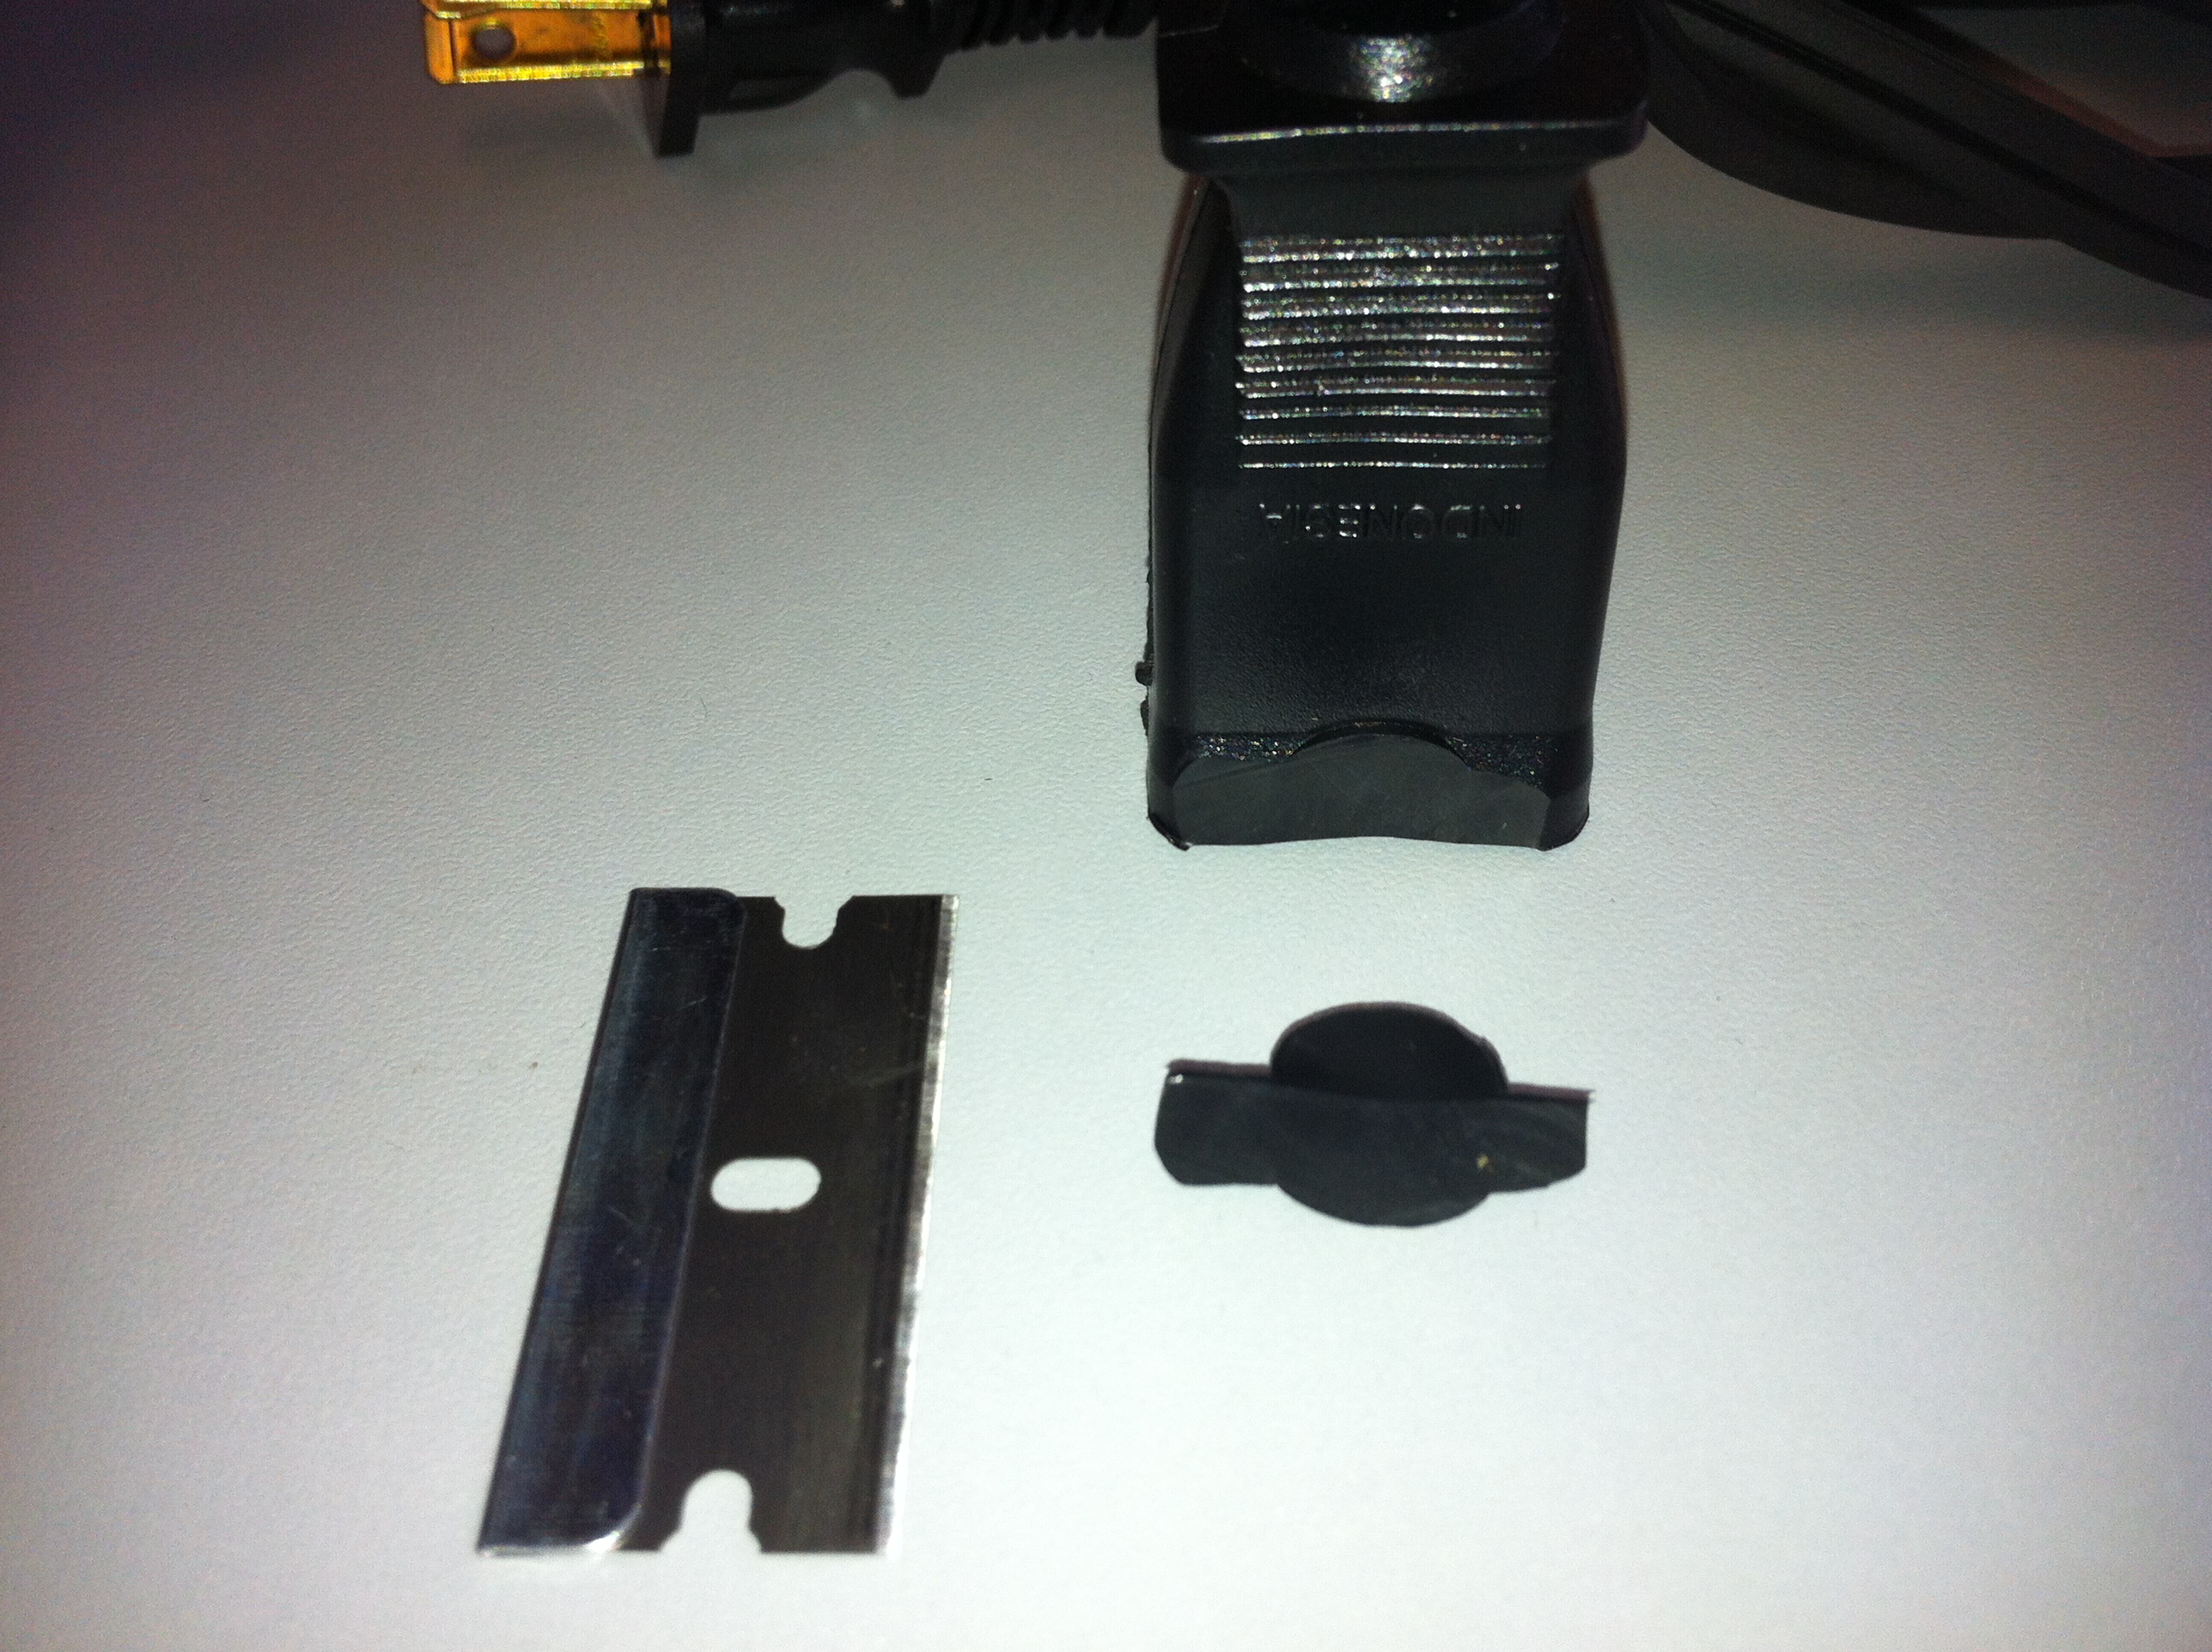
it’ll fit just fine, and there will still be a protective plastic sheath to protect you and your equipment from electrical arcs. Now we’re back in business doing our reel to reel to CD and MP3 transfers!

Apparently it will also work on these models: Teac-Tascam models for sure; 33-4, A-1500, A-1500W, A-1230, A-1250, A-1250S, A-2050, A-2300S, A-2300SD, A-2300SR, A-2300SX, A-2340, A-2340SX, A-2520, A-3300S, 3300SR, A3300SX, A-3300SX, A-3340, A-4000S, A-4010, A-4010S, A4010SU, AR-40S, AR-60, A-6010, A-6010S. Pioneer models for sure; Pioneer RT-1010, RT-1010L, RT-1011, RT-1011L, RT-1020, RT-1020H, RT-1020L, RT-1050, RT-1050H RT-1050L. Many Sony R2R’s including TC-530 / TC530, TC-540 / TC540, TC-630/ TC630, TC-651 / TC651, TC-850 / TC850. Some Sansui Receivers & Reel to Reels. Also will fit some Elka Organs / Keyboards such as the Panther. Also will fit the Organ King II amp by “Amplifier Corporation of America”.

How to Reduce and Remove Pop and Clicks from LP Vinyl Records

Vinyl records, while not the most durable forms of media in the world, are still collected and played today because of their unique sound when in good condition. Over the years, records can deteriorate quite a bit, and if played on a turntable in this condition, could produce loud pops and clicks over your speakers. In years past, this problem was extremely difficult, if not impossible, to eliminate completely. However, with modern digital audio and audio editing programs, learning how to remove pop and clicks and other unwanted sounds from your recording is as easy as ever. For this example I will be using a free to donwload audio editing program called Audacity.

You can download Audacity for yourself (Windows / Mac) from the following site: https://audacity.sourceforge.net/download/

Before you can edit the audio, you first need to digitize the LP to the computer. This can be easily accomplished by taking your record through our Vinyl Record to CD service, digitizing your audio as raw WAV, as well as having a copy of your record on a 100-year archival CD. You could also do the transfer from home by purchasing a new USB turntable from Amazon, which connects right into the back of your computer and allows you to record right from Audacity.

Once your LP has been digitized in WAV format, it’s now time to edit out the unwanted pops and clicks. From the file menu in Audacity, select Open, and find the WAV file of your LP that you wish to edit. Once it’s loaded up on the timeline, you should see something like this:

If you notice, you’ll see long veritcal lines throughout the song. These peaks are the actual pops and clicks that are heard in the recording. We need to attempt to remove these vertical lines from the recording to make it sound much more clean at louder volumes.

To remove pop/clicks from the entire recording, you can do this by pressing CTRL-A, or select all from the edit menu. Once the track is selected, click on Effect->Click removal.

Usually, I’ve found that the default threshold values work fine most of the time, but feel free to play around wih them a bit to get the sound you desire. When you set the threshold, you can preview it before applying. When finished, press OK and the filter will now be applied to the whole track.

Keep in mind that this fix will not work for EVERY situation, but should work for the vast majority of audio with popping and clicking noises throughout.

Vinyl records, while not the most durable forms of media in the world, are still collected and played today because of their unique sound when in good condition. Over the years, records can deteriorate quite a bit, and if played on a turntable in this condition, could produce loud pops and clicks over your speakers. In years past, this problem was extremely difficult, if not impossible, to eliminate completely. However, with modern digital audio and audio editing programs, removing these unwanted sounds from your recording is as easy as ever. For this example I will be using a free to donwload audio editing program called Audacity.
You can download Audacity for yourself (Windows / Mac) from the following site: https://audacity.sourceforge.net/download/
Before you can edit the audio, you first need to digitize the LP to the computer. This can be easily accomplished by taking your record through our Vinyl Record to CD service, digitizing your audio as raw WAV, as well as having a copy of your record on a 100-year archival CD. You could also do the transfer from home by purchasing a new USB turntable from Amazon, which connects right into the back of your computer and allows you to record right from Audacity.
Once your LP has been digitized in WAV format, it’s now time to edit out the unwanted pops and clicks. From the file menu in Audacity, select Open, and find the WAV file of your LP that you wish to edit. Once it’s loaded up on the timeline, you should see something like this:
If you notice, you’ll see long veritcal lines throughout the song. These peaks are the actual pops and clicks that are heard in the recording. We need to attempt to remove these vertical lines from the recording to make it sound much more clean at louder volumes.
To remove pop/clicks from the entire recording, you can do this by pressing CTRL-A, or select all from the edit menu. Once the track is selected, click on Effect->Click removal.
Usually, I’ve found that the default threshold values work fine most of the time, but feel free to play around wih them a bit to get the sound you desire. When you set the threshold, you can preview it before applying. When finished, press OK and the filter will now be applied to the whole track.
Keep in mind that this fix will not work for EVERY situation, but should work for the vast majority of audio with popping and clicking noises throughout.

The Top 5 Audio Editing Applications

Whether you’re a music producer, studying in college, or making the next cinematic masterpiece, you’re going to need a good audio editor to get you there. In this post, we’re going to take a quick look at the top five best audio editing applications and digital audio workstations (DAW) based on nominations from LifeHacker.com

Audacity

Free and open source, Audacity makes audio editing simple and easy for all major platforms. It’s not a digital audio workstation necessarily, but if you’re a DJ looking to polish a set before publishing to the internet, or if you just want to do some simple noise reduction from your music collection or normalize the volume, Audacity is a very powerful, yet simple tool, which is easy to master and gets the job done quickly. It supports a wide variety of the most common file types, including mp3, OGG, WAV, AIFF, and more. Audacity can also even record live audio for editing and export later, if you computer has a microphone or line-in hooked up. Plus, Audacity’s flexible features make it perfect for home projects like basement mixes and fixing up audio from cassette to CD and vinyl to CD transfers. You can read more about Audacity’s features here.


Adobe Audition

Formerly called Cool Edit Pro, Adobe Audition is a powerful set of tools packages into one solid program. It’s a powerful suite that makes audio editing and restoration a breeze to do. It’s a bit pricier than most audio applications at $349, but packs a host of advanced features and nice looking user interface. Audition supports just about all types of audio formats, and has a ton of built-in bells and whistles to make your audio editing easier and more powerful. To read more about Adobe Auditions features, check them out here.


Avid Pro Tools

Avid Pro Tools is more of a digital audio workstation than the previous two, although it can edit existing audio like a professional. Professional musicians use Pro Tools for enhancing and mastering studio recordings and album mixes, DJs use it to correct mistakes in their mixes after the fact, and music producers can assemble entire albums in a fraction of the time required with other tools. All of these features come at a price of $699 for the basic version, but for the money you get an industry-standard, studio-grade tool that supports ANYTHING you send its way, has a wealth of plug-ins to extend its functionality and works seamlessly with studio equipment. You can read more about Avid Pro Tools features here. Amazon also has Avid Pro Tools available for purchase.

[amazon_link id=”B006PKIJ16″ target=”_blank” ]Click Here to Purchase Avid Pro Tools 10 Student Edition[/amazon_link]


Reaper

Reaper is another digital audio workstation that is praised for its variety of options and deep feature set, and the fact that it’s a lightweight application—especially when compared with other audio editing suites with similar features. It offers plugin functionality, which can appeal to a wide variety of musicians. Reaper works just as well if you want to record music from professional gear or an amateur setup too, or if you want to make music entirely with your computer using beat making or music software. Reaper features hundreds of built-in effects and features to make your music really shine, and has a large active community of users to help with support. You can read more about Reaper’s features here.


Ableton Live

Ableton Live is about making music; for composition, songwriting, recording, production, remixing and live performance. Live’s nonlinear, intuitive flow, alongside powerful real-time editing and flexible performance options, make it a unique studio tool and a favorite with live performers. If you’d rather be “making music” than just “using music software,” Ableton Live is for you. Live 8, the latest version, includes a wealth of new techniques and improvements with a new groove engine, revamped warping, live looping, new effects, crossfades in the Arrangement View and a reworked MIDI editor.

What is the Best VHS-C Adapter?

Back when the VHS format reigned supreme, it actually had two different sizes. There was the standard VHS tape that everyone knows and there was also the VHS-C. VHS-C tapes are basically compact versions of the VHS tape, made smaller to fit the much more desirable handheld camcorders. The creators of this tape felt they had a great idea, but needed a way for people to easily play these tapes on their existing home equipment. This is where the VHS-C adapter comes in. This VHS-C adapter will hold your VHS-C tape, and mount it in a shell of the same size and shape of a VHS tape, allowing it to play in your home VCR with no additional modifications.

VHS-C Adapter

If you have Maxell VHS-C tapes, this third option might be the best for you. The reviews seem to indicate that it may have problems getting stuck in some models of VCRs. This adapter is probably adequate for simple jobs such as VHS-C to DVD transfers or simple viewing on your TV.

DVD Your Memories provides the following VHSC Transfer Services: VHS-C to DVD San Diego VHS-C to DVD Orange County VHS-C to DVD Los Angeles VHS-C to DVD Denver

How To Transfer and Capture MiniDV Tapes to Your Computer

MiniDV tapes are a great medium for recording and capturing memories on video. The camcorders are small and compact, and the tapes even smaller, making carrying it with you an ease. MiniDV is a pretty versatile format, with many camcorders providing additional outputs for making capturing to your computer easier such as Firewire or USB. In order to watch or transfer your tapes to your computer, Mini DV tapes require a player or a camcorder that is compatible to record or play MiniDV cassette tapes. This means that you will not be able to play MiniDV tapes on on your home VCR or computer without first digitizing them, or transferring the video off of the tape. The easiest way to capture MiniDV tapes is to just use the same camcorder you used to record them in the first place. If this camera is no longer available to you, you’ll need to buy, rent or borrow one from somebody else. There are also standalone MiniDV players, but they can get pretty expensive in comparison to the camcorders. You can use the original camcorder to watch your tapes again, or use it to transfer MiniDV tapes to hard drive.

The process below will work for ANY MiniDV camcorder. Keep in mind that some newer camcorders might have proprietary cords and software to make this process moderately easier. Consult your instruction manual to see the features of your camcorder before beginning the transfer process. Below are some items we recommend for a clean transfer. I’ve included some quick links to Amazon, in case you need to get them prior to starting.

Make sure your computer has a firewire port or card installed. These are relatively cheap, and can add a significant transfer speed boost. Also make sure you grab a firewire cable.

RCA cables – These cables hook up to your camcorder to provide the video and audio signals to your computer. Make sure you get the correct one for your camcorder, consult the manual for the correct type.

Canopus ADVC110 Converter – hooks up to your computer via firewire and provides a way to capture MiniDV video and convert the video camcorder signal into your computer as a video file.

Video capture software – Sony Vegas has a great built-in video capturing program.

There are a couple of different ways to capture your MiniDV tapes onto your computer, depending on your model. The method I will explain is the Canopus method. The first step is to find an analog to digital converter, such as a Canopus ADVC. This device will grab the video signal from your camcorder, and then feed it into your computer for capturing. is to hook up a camcorder to your TV using the audio/video cables. You could also hook up the camcorder in a similar fashion to your computer and use a video capture program to record the video onto your computer’s hard drive.

Once your Canopus is connected to your computer via firewire cable, and you’ve obtained a camcorder with RCA or DV cables, and video capture software, you are nearly ready to start capturing video . To begin the process, connect your VCR or Cam to the Canopus with the RCA cables. After this, open your video capture software, and in the options, set the capture folder up so you know where the video will be once recording has finished. If you plan to do other tasks on your machine as it’s capturing, it’s recommended that you set the priority of your video capture software to “high”. You can do this bringing up the task manager by pushing Ctrl+Alt+Delete Select, find your video capture software on the list, right click it, and select process priority high. Next, take the tape you would like to have transferred and ensure it is fully rewound. Visually inspect the tape to make sure it’s free of mold, dirt, or other debris, then insert it into the tape player.

All that’s now left to do is to hit play on your tape player, and as soon as the video begins, click the start capture button on your video capture software. If everything went smoothly, you should see your video playing in the preview window of your video capture software, as it is being captured. Once your video tape is over, stop the capture, and in the source folder, you will find your new captured AVI video file, which is ready to be edited or converted to any form of video you choose. More and more people are realizing the ease and flexibility of virtually uncompressed AVI files, as opposed to the standard San Diego MiniDV to DVD transfer.

DVD Your Memories Labor Day 2012 Schedule

Here’s the schedule of which stores will be open on Monday, Sept. 3rd for Labor Day.

San Diego Store: 10:00 AM – 7:00 PM
Orange County Store: Closed
Los Angeles Store: Closed
Denver Store: Closed

Have a great weekend!

Audio Restoration Services Now Available!

Restore Your Precious Legacy Audio with DVD Your Memories

LPs, Cassettes for Audio Restoration

DVD Your Memories is now offering audio restoration services for RAW audio files, as well as for any media type that we currently transfer. We can provide audio cassette restoration, LP Record and vinyl restoration, microcassette restoration and reel to reel audio restoration.

For pricing information, please visit our audio restoration page.

Volume Management

Normalization

This process finds the highest wave peak in a selection, calculates the distance between that peak and the loudest allowable volume without being over-driven, and amplifies the selection by the value of that difference. This is useful when the item in question has a fairly average level of volume throughout yet could stand to be a bit louder.

Maximization

A more complex volume processing technique, the purpose of which is to “compress” the dynamic range of the piece. It allows you to give the piece the desirable amount of gain throughout the selection without overdriving it. The primary difference between this process and normalization is that maximization will bring the perceivable volume level of all elements within the selection to be more equal whereas normalization will maintain the difference in volume between loud and quiet sounds. This process is particularly helpful in situations where the overall volume of a piece is irregular/inconsistent to a degree that is undesirable.

Noise/Hum Reduction


Noise reduction is the process by which one identifies a selection of sonic frequencies within a piece are as “noise” (generally undesirable sound) and reduces them in volume or negates them entirely, leaving the desirable frequencies more or less intact. The problem with this process, though, is that the frequencies which make up “noise” often reside in the same spectrum as the desirable frequencies, particularly those which make up the vocal spectrum or that which we identify as “brightness” in music, and can have an adverse effect on the sonic qualities of the piece. So, only undertake noise reduction with great care for the content. Varying levels of reduction are appropriate for different situations.

For example, a piece of dialogue can stand to have a certain amount of reduction to improve clarity, perhaps not sounding quite as crisp or clear but at least not being drowned by tape hiss. On the other hand, a piece of music can suffer greatly from noise reduction resulting in a “deadening” of the tonal quality. One can counter this effect by another type of processing called harmonic excitation (see below) to restore some of the original frequencies that were removed.

Spectral Editing


Sometimes the semi-automated processes of noise/hum reduction just can’t get a hold of certain sounds and leave behind irritating artifacts. In situations such as this, spectral editing comes into play. In this service, the technician will bring up a spectral display of the selection which shows a visual representation of the audible frequencies. This enables us to visually hunt down and eliminate rogue noises with precision and accuracy.

Pop & Click Reduction


Pops and clicks are a very common sound that we hear when we listen to old vinyl albums. Some attribute the sound to this media as a trademark of their sound properties and even enjoy it while others may find it incredibly irritating or distracting. For the discerning customer seeking maximum clarity we offer the service of reducing and, when possible, removing pops and clicks from a recording. There are two levels to this service, one if which uses an automated process which seeks out quick, sharp wave variations not in line with the rest of the wave and smooths them out.

It is not, however, a perfect system and can be fooled if a pop is longer or not as sharp as others and will therefore remain. In these situations we can go in and manually remove such anomalies – this is level two. While the latter is the only way to guarantee complete elimination of all pops and clicks, it is a very time consuming process and can require a large investment of time and effort on the part of the technician.

Equalization


If the piece we are handling is lacking in certain frequency bands we can use the equalizer or “EQ” to boost those areas. It is not uncommon for a selection of music to have nice crisp highs in the treble frequencies yet disappointing bass response or even vise versa. EQ is the perfect tool for the job. Using this process, we can accurately identify under-expressed frequency bands and give them the gain boost they require to have the same punch as the rest of the piece, hence the name ‘equalization.

Harmonic Excitation


Do you notice that your music sounds lackluster? Does it sound like it was recorded in a cardboard box? This might do the trick. The technique of harmonic excitation is used to give life and vividness to a piece in dire need of it. Every natural sound has harmonics. Such sounds do not ring on only one frequency, they ring out on many frequencies above and including a primary frequency. These additional frequencies are called harmonics. The varying and unique distances between these harmonic frequencies are what give different objects and instruments their tonal qualities.

When you use a harmonic exciter, you are adding harmonic frequencies to a selection that were not there before. The resulting effect is that the piece sounds more real, more alive, almost as though you were in the room during the recording. When used correctly, this process can make a huge difference on any piece of audio, particularly in the case of music.

Stereo Widening


Stereo widening is yet another helpful trick to enhance the realism of a selection. By extracting and expanding the stereo field, the elements within seem to be more accurately placed on a stereo “stage” when normally it would sound as though they were all taking place in the same defined point directly in the center. In the audio industry we refer to the latter effect as “dead center” as it sounds so much less alive. When stereo widening is applied to your audio, you will notice a significant difference in the immersive quality of the final product.

1 13 14 15 16 17 44