Compatibility Guarantee - All Media Transferred Local

Photo Scaninning

Photo
Scanning

Slide Scaninning

Slide Scanning

Negative Scanning

Negative Scanning

Video Transfer

Video Tape Transfer

Film Transfer

Film
Transfer

Audio Transfer

Audio Transfer

Slideshows

Celebration
Videos

Latest Posts

A List of Video Tape Formats, Types of Video Tapes

As technology progresses, we’re constantly switching out the old for the new. Well, as everyone already knows, this also applies to your family media such as video and audio tapes. There’s been so many different tape formats and shifts of technology over the years, it’s hard for anyone to keep track of the model names or equipment needed to play their old video tapes. Hopefully this list of video tape formats will help you figure out exactly what kind of tape you have, so you can give yourself a better idea of how to proceed. The chart below lists the various tape formats of audio we can transfer to CD or hard drive. While not as complicated as the multiple types of video tapes, it can still often be confusing as to what exactly you’re looking at.

Microcassette -Introduced by Olympus in 1969 -Smaller than a standard audio cassette -Typically used for voice recordings and home answering machines Microcassette to CD
Audio Cassette -Format developed by Phillips and released in 1963-1964 -Most popular audio recording medium for consumers until the development of CDs Audio Cassette
Reel to Reel -Developed in the 1940s -Can be recorded and played at various speeds. Reel to Reel Audio
LP/Vinyl Record -One of the earlier recording mediums as it was developed in the late 1800s -Could be played at various speeds, still popular to this day. Vinyl Record

List of supported video tape formats.

MiniDVD -DVD disc having 8 cm (3 in.) in diameter. -Recordable 8 cm discs are commonly used in DVD-based camcorders. Depending on variant, these discs can offer up to 5.2 GB of storage space. MiniDVD
MicroMV -MicroMVwas a proprietary videotape format introduced in 2001 by Sony. -Physically the smallest of all video tape formats, 70% smaller than a MiniDV cassette MicroMV
MiniDV -Released in 1998 as part of joint efforts of leading producers of video camera recorders. -Recorded in digital (DV) same as Digital8 -Tapes could hold 1hr SP, 90min EP MiniDV
Video8, Hi8, Digital8 -Developed through the 80s and 90s -Most popular consumer camcorder tapes through the 90s due to small form factor and higher quality than that of the VHS. Video8
VHS-C -Released by JVC in 1982 as a compact VHS. -The format is based on the same videotape as is used in VHS, and can be played back in a standard VHS VCR with an adapter. VHC-C
VHS -Developed by JVC and introduced in 1976. -During the late part of the 1970s and the early 1980s, the home video industry was involved in the VHS vs. Betamax war, which VHS would eventually win.
Betamax -Developed by Sony, released on May 10, 1975. -Although generally considered the superior quality tape, Betamax lost the format war to VHS in the 80s. Betamax
3/4″ U-Matic -Developed by Sony, released in 1971 as a professional video tape format. -It was among the first video formats to contain the videotape inside a cassette, as opposed to the various open-reel formats of the time. U-Matic
Betacam -Developed by Sony in 1982. -The format supplanted the three-quarter inch U-Matic format, which Sony had introduced in 1971 Betacam tape

Are 8mm Video Tapes the Same as Hi8 Video Tapes? Video8 vs Hi-8

With all of the different format of video tapes throughout the years, it can be hard to keep track of what camera you have and which tapes are compatible with what. With the 8mm tapes in particular, 3 different types of tapes were released that all look identical to each other. The first tape to release was the 8mm tape or video8, followed by the release of the Hi8, and finally the Digital8. Most people wonder what the difference is between Video8 vs Hi-8.

Thankfully, the camcorder manufacturers had the sense to make their products backwards compatible with older versions of the tapes. So if you had several original 8mm tapes, you’d be able to play them on your Hi8 or Digital8 camera. However, you wouldn’t be able to play your Hi8 or Digital8 tapes on your old plain 8mm camcorder. This makes it easy to play back your whole collection if you were to obtain a Digital8 camcorder.

All of the tapes are housed in nearly identicle cassette casings. Digital8 tapes are a bit easier to spot due to the fact that they display both the Hi8 running time (120m) and the Digital running time (60m). It’s a little tougher to tell the difference between Hi8 and Video8. Hi8, for instance, could also be used for recording Digital8 footage, which would then make the tape incompatible with a Hi8 camera, even though the tape says it is. This is often confusing for people who purchase cameras looking to view or transfer their video8 to DVD or Hi8 to DVD. If your completely unsure of what kind of tape you have, it may be best to purchase a Digital8 camcorder, so you can be sure it will play all tape formats.

Improve quality of your VHS to DVD Transfers

Most VHS tapes just do not look as good when played today as it did 20 years ago. They can suffer from all sorts of symptoms such as color loss or degradation, warping, flickering etc. Often times these problems can be so severe, that it can distract from the video itself. Thankfully, with a little bit of knowledge and equipment, you can still get the most our of your VHS to DVD transfers.

The fist step to improving the quality of your VHS tapes is to start at the source, and make sure your tape is cleaned, and in good condition. Sometimes you may find that you need to repair your VHS tape and put it in a new shell. You’ll also need to find a good quality VCR. Transferring your tapes in a poor quality VCR will be much much harder to restore with software. It’s always recommended to get the highest quality initial transfer as possible.

Sometimes I’ve found that the VCRs from the 90s will play old tapes better than a brand new one from the store. VCR’s are not all created equally and so sometimes it’s a gamble to find a really good piece of equipment. The types of VCRs that will give your the most improvement on your VHS to DVD transfers would be a professional name brand or broadcast quality VCR with a built-in or standalone TBC, or time-based correcter.

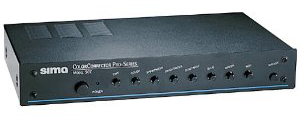
Once you have a good working VCR in order, you shoud also look into obtaining a color correction unit. These nifty devices receive the video signal from your VCR and allow you to finely tune the colors of your video so that you can get very close to the original colors on the tape. Again, this step of correcting the color at the transfer source will save you editing hours later on. Sometime different scenes will shift to different colors, so it’s wise to monitor your video so that you can make any adjustments needed as it’s recording.

Once the video has been transferred to your computer, the last step is editing the video clip through a software based video editor such as Final Cut Pro or Sony Vegas. With these programs you can touch up the video and remove any remaining blemishes, as well as clean up the audio if needed. If you follow these basic steps, you will dramatically improve the quality of your VHS to DVD or VHS to hard drive transfers.

DVD Your Memories Sponsoring for 2011

DVD Your Memories takes pride in helping out our communities. We sponser a wide variety of organizations each year because we know how beneficial it can be to these groups. Here’s a quick peek at some of the organizations we’ll be sponsoring during 2011. DVD Your Memories helps by donating gift certificates good for any of our services including film to DVD San Diego and video to DVD, cash donations, equipment and media donations.

DVD Your Memories will be sponsoring The Parent Connection Spring lunch event in May, 2011. The Parent Connection is committed to supporting parents with infants and young children throughout San Diego County. They provide quality educational programs and opportunities to establish friendships through playgroups and various social activities.

Pomerado Elementary School and Birdrock Elementary School will be hosting a school fundraiser in upcoming months of 2011. DVD Your Memories has donated gift certificates towards these great fundraisers, look for us in the event programs!

Sunset Hills Elementary will be hosting a Jog-a-Thon next month where students will be jogging while wearing a special Jog-a-Thon 2011 T-shirt. The proceeds will go to help the school and the Amazon Rainforest.

University High School Aquatics Booster Club came by our OC office last month and was telling us about their fabulous water polo program. With DVD Your Memories as their new sponsor, you can be sure there will be tons of new memories to come!

DVD Your Memories will also be sponsoring the Westview Dance Troupe dance competition in January 2011. Don’t forget to check out this unforgettable performance!

Change Speed Of Your Audio – Remove Chipmunk Effect

Do you have recordings of people sounding like chipmunks? This is typically a problem of differentiating tape playback speed. When a tape is played back at a speed that is faster than what it was recorded on, you will get the chipmunk effect. If the opposite happens, then you’re recording will sound slooooooooow with lower tone. When transferring your own media, you may soon discover that not all devices include an option for changing playback speed. In this short guide, you’ll learn a quick method to remove chipmunk effects from your recordings.

Sometimes just transferring to your computer is only the first step to restoring your precious old recordings. Thankfully there exists some great free tools that can help us out when recordings decide to be difficult. One tool, which I’ve mentioned in the past that we use quite often in our facilities, is Audacity. Audacity is a free open-source audio editor. Although a light program, it’s packed with great features you’d normally have to pay an arm and a leg for, and it does them pretty well. In order to change the speed of a recording it first must be transferred to your computer via cassette to cd transfer or reel to reel to cd. Once you have the audio file, open it up with Audacity.

Once it’s loaded onto the timeline, you can now begin to edit the audio. To change the speed of the recording we first must select where we’d like it to take effect. If the file you’re working with is of a consistant speed throughout, you can simply press Ctrl+A to select the whole recording. If there are scattered breaks of different speeds, you’ll need to select only the parts of the audio that need a speed change.

Once you have determined where to place your speed change, you’ll need to click on the effect->change speed menu item at the top of the program.

You will now be presented with a box that you can input values of how much you’d like to change the speed by percent. Putting 50 in the box will increase the speed of your recording by 50%. By inputting -25, you will slow your recording down by 25%. Below that is a convenient vinyl record conversion box which will take care of correcting your vinyl record speeds. Once you determine the correct percentage, click preview to test it out, and then OK to apply the change. Once you are finished with all of your speed changes, you can easily save a new audio file by clicking on File->Export and then selecting your audio type.

We offer audio transfer services such as cassette to CD, Vinyl to CD, and reel to reel to CD in San Diego and Irvine.

Machform Review – The Best Online Contact Form

Machform Review

In business, communication is key. Quickly engaging and communicating with interested customers or inquiries can help drive your sales up to new levels. One of the best tools we’ve found for easy communication from our website to our customers is Machform.

Machform is a great, easy to use tool which easily provides you with online contact forms to place onto your website. Machform is self-hosted and PHP-based which includes it’s own control panel for completely customized forms. We couldn’t believe how easy it was to get up and running and start making our form, it really took only a single click to get things started. The interface is very easy to use, and you don’t need any coding experience to create an eye-pleasing form to present on your website.

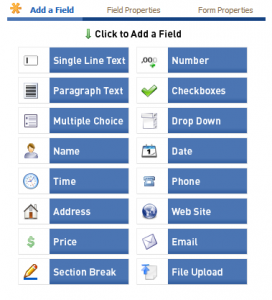
To get started on your first form, it’s really as easy as dragging and dropping. You select which box you’d like to appear on your form and then drag it to where you’d like it to appear on the form. Not to mention the fact that there are many different variations of input boxes you can place such as plain text box, a multiple choice box, file upload, drop-down menu, etc. You can also create multiple forms which are easy to manage right from the clean form manager interface.

Another great feature is that Machform is able to link up to one or several email addresses. This allows you staff to receive Machform submissions immediately to their email inbox. To make it more convenient, you can make your email address your mobile text number so when anyone submits a form, you receive a text message alert right to your phone which allows you to get back to customers within seconds! All of the completed forms are stored on your databases, so you’ll always have access to past forms.

Machform is a great contact form for any website that we highly recommend. For only $39 a license, you get an amazing product, and stellar customer support. You can rest-assured that this form will do its job, and do it very well, saving you many headaches and hassles. Try out a demo for yourself.

Transfer Your Old Zip Disks and Floppy Disks to Your Computer

It’s no secret by now that technology evolves at an incredible pace. The computers and electronics we build today are seemingly obsolete within months. This is especially true with data storage methods and devices, as many people today are looking for methods to transfer Zip Disks and floppy disks to their hard drives. In the early days of computing, in order to transfer data from one computer to another, we used what was called a floppy disk.

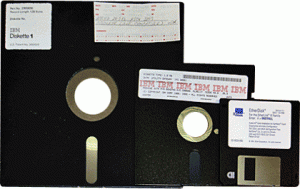
Floppy Disk The first floppy was an 8-inch flexible plastic disk coated with magnetic iron oxide which allowed the computer to read and write data from the disk’s surface. The nickname “floppy” came from the original disk’s flexibility.

The floppy disk was considered a revolutionary device in the early days of computing for its portability which allowed users a new and easy physical means of transporting data from computer to computer. This 8-inch floppy soon evolved into a smaller 5 1/4 inch size, which then evolved to the more common 3 1/2 inch disks, with a maximum capacity of 1.44mb. The 3 1/2 format was extremely popular well into the new millenium and you can still find them in computer retail stores today.

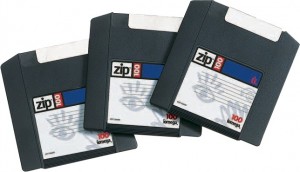
Zip DiskThe rise of the 3 1/2 inch disk brought about the development of high capacity magnetic media device, as many people needed a more practical option than using 1.44mb capacity disks. To fill this emerging niche, the Zip Drive was released in 1994 by Iomega and was capable of reading and writing to specialized disks called Zip Disks with a capacity of 100mb. Zip disks were very popular, but they never fully replaced the 3 1/2 in. format. Eventually Zip Drives were phased out in favor of cheaper, higher capacity media such as CD-R and flash thumb drives.

If you examine your own “digital-history” you may remember having some of these disks laying around, and may even remember copying important photos or documents onto them. Although the technology is basically obsolete, we have the tools and experience to extract data off of these devices, and put them right back onto your computer. If you do have important data, it’s a wise move to transfer your Zip Disk to your computer or other modern storage medium.

How to Transfer Zip Disks and Floppy Disks to Your Computer

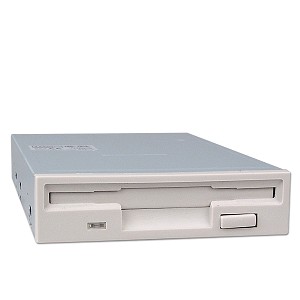
If you are someone who has lots of old disks laying around and are curious to see what’s on them, or retrieve their data, you’ll need to get your hands on a drive that is capable of reading them. If you have 3.5 inch floppy disks, your computer might even have a drive built in. If so, it looks similar to the image below.

Since most computers sold today do not come with a stock floppy or zip drive, the next alternative you have is to purchase one from a store or online retailer. We actually recommend a USB based drive, as it’s very easy to use by simply plugging into an open USB port on your computer. Once the drive is plugged in, it acts almost like an external hard drive, so all you’d need to do is open the disk up and drag the files/folders you want to copy onto your computer.

1 35 36 37 38 39 44