Compatibility Guarantee - All Media Transferred Local

Photo Scaninning

Photo
Scanning

Slide Scaninning

Slide Scanning

Negative Scanning

Negative Scanning

Video Transfer

Video Tape Transfer

Film Transfer

Film
Transfer

Audio Transfer

Audio Transfer

Slideshows

Celebration
Videos

Latest Posts

Audio Restoration Services Now Available!

Restore Your Precious Legacy Audio with DVD Your Memories

LPs, Cassettes for Audio Restoration

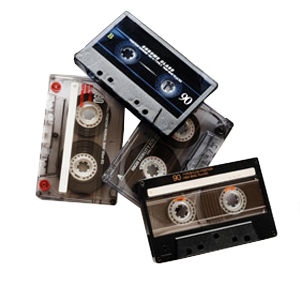
DVD Your Memories is now offering audio restoration services for RAW audio files, as well as for any media type that we currently transfer. We can provide audio cassette restoration, LP Record and vinyl restoration, microcassette restoration and reel to reel audio restoration.

For pricing information, please visit our audio restoration page.

Volume Management

Normalization

This process finds the highest wave peak in a selection, calculates the distance between that peak and the loudest allowable volume without being over-driven, and amplifies the selection by the value of that difference. This is useful when the item in question has a fairly average level of volume throughout yet could stand to be a bit louder.

Maximization

A more complex volume processing technique, the purpose of which is to “compress” the dynamic range of the piece. It allows you to give the piece the desirable amount of gain throughout the selection without overdriving it. The primary difference between this process and normalization is that maximization will bring the perceivable volume level of all elements within the selection to be more equal whereas normalization will maintain the difference in volume between loud and quiet sounds. This process is particularly helpful in situations where the overall volume of a piece is irregular/inconsistent to a degree that is undesirable.

Noise/Hum Reduction


Noise reduction is the process by which one identifies a selection of sonic frequencies within a piece are as “noise” (generally undesirable sound) and reduces them in volume or negates them entirely, leaving the desirable frequencies more or less intact. The problem with this process, though, is that the frequencies which make up “noise” often reside in the same spectrum as the desirable frequencies, particularly those which make up the vocal spectrum or that which we identify as “brightness” in music, and can have an adverse effect on the sonic qualities of the piece. So, only undertake noise reduction with great care for the content. Varying levels of reduction are appropriate for different situations.

For example, a piece of dialogue can stand to have a certain amount of reduction to improve clarity, perhaps not sounding quite as crisp or clear but at least not being drowned by tape hiss. On the other hand, a piece of music can suffer greatly from noise reduction resulting in a “deadening” of the tonal quality. One can counter this effect by another type of processing called harmonic excitation (see below) to restore some of the original frequencies that were removed.

Spectral Editing


Sometimes the semi-automated processes of noise/hum reduction just can’t get a hold of certain sounds and leave behind irritating artifacts. In situations such as this, spectral editing comes into play. In this service, the technician will bring up a spectral display of the selection which shows a visual representation of the audible frequencies. This enables us to visually hunt down and eliminate rogue noises with precision and accuracy.

Pop & Click Reduction


Pops and clicks are a very common sound that we hear when we listen to old vinyl albums. Some attribute the sound to this media as a trademark of their sound properties and even enjoy it while others may find it incredibly irritating or distracting. For the discerning customer seeking maximum clarity we offer the service of reducing and, when possible, removing pops and clicks from a recording. There are two levels to this service, one if which uses an automated process which seeks out quick, sharp wave variations not in line with the rest of the wave and smooths them out.

It is not, however, a perfect system and can be fooled if a pop is longer or not as sharp as others and will therefore remain. In these situations we can go in and manually remove such anomalies – this is level two. While the latter is the only way to guarantee complete elimination of all pops and clicks, it is a very time consuming process and can require a large investment of time and effort on the part of the technician.

Equalization


If the piece we are handling is lacking in certain frequency bands we can use the equalizer or “EQ” to boost those areas. It is not uncommon for a selection of music to have nice crisp highs in the treble frequencies yet disappointing bass response or even vise versa. EQ is the perfect tool for the job. Using this process, we can accurately identify under-expressed frequency bands and give them the gain boost they require to have the same punch as the rest of the piece, hence the name ‘equalization.

Harmonic Excitation


Do you notice that your music sounds lackluster? Does it sound like it was recorded in a cardboard box? This might do the trick. The technique of harmonic excitation is used to give life and vividness to a piece in dire need of it. Every natural sound has harmonics. Such sounds do not ring on only one frequency, they ring out on many frequencies above and including a primary frequency. These additional frequencies are called harmonics. The varying and unique distances between these harmonic frequencies are what give different objects and instruments their tonal qualities.

When you use a harmonic exciter, you are adding harmonic frequencies to a selection that were not there before. The resulting effect is that the piece sounds more real, more alive, almost as though you were in the room during the recording. When used correctly, this process can make a huge difference on any piece of audio, particularly in the case of music.

Stereo Widening


Stereo widening is yet another helpful trick to enhance the realism of a selection. By extracting and expanding the stereo field, the elements within seem to be more accurately placed on a stereo “stage” when normally it would sound as though they were all taking place in the same defined point directly in the center. In the audio industry we refer to the latter effect as “dead center” as it sounds so much less alive. When stereo widening is applied to your audio, you will notice a significant difference in the immersive quality of the final product.

Clean Your Vinyl LP Records With Wood Glue, Safely!

Cautions:
This method is for vinyl LPs only – NOT for 78 rpm shellacs. Polyvinyl Acetate glues will adhere and tear apart 78s. The jury is still out on 7” 45 rpms. There has not been enough testing on these polymer cousins to make a call. For preservation of your stylus, it is very important that orphaned “islands” of dried PVA glue be removed from both the run-in and run-out of a treated LP. Also, don’t glue up your records and forget about them for a few weeks. The chemical nature of many pva glues can change over long term curing and begin to pose a risk of leeching plastic away from the record.

PVA glues aren’t necessarily wood glues, although all wood glues are PVAs. Wood glues are dyed yellow in North America, while they remain white throughout most of the rest of the world. A number of “hobby” glues like Elmer’s and Aileen’s are also PVA glues. If you are unsure whether a particular glue is PVA based, information should be available from the manufacturer’s website.

This method of cleaning/restoration has been around for, at least, 28 years. In an old issue (No. 16) of the long defunct Audio Conversion magazine, contributor Eric Stubbes refers to an article by Reginald Williamson that was published in the Audio Amateur issue No. 4 (1981) and appears to be the first documented description and use of this PVA glue cleaning technique. The early germination of this method in Great Britain tends to reinforce reports that the BBC has used (and continues to use?) pva glue cleaning for archival purposes.

Turn Old VHS Cases into Retro Spiral-Bound Notebooks

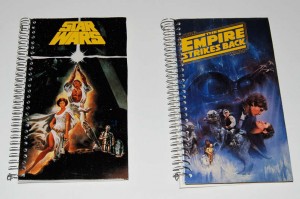
There’s all sorts of different things you can do with your old media. With old VHS tapes, you can make a variety of cool things like this awesome spiral-bound notebook made from the front of old VHS tapes.

Instructables.com has a great step-by-step guide on how to create your own spiral-bound notepad made from recycled VHS tape covers. If you have basic supplies like a hole punch, ruler, and pliers, then pretty much all you’ll need to spring for is a few pre-made spiral-bound notebooks from the office supply store (unless you happen to have a binding machine stashed somewhere). Perfect for after sending the old tapes in for VHS to DVD conversions!

To read more, check it out here!

How to Organize Your Digital Photos and Images, Easy Steps to Keep Your Media Categorized

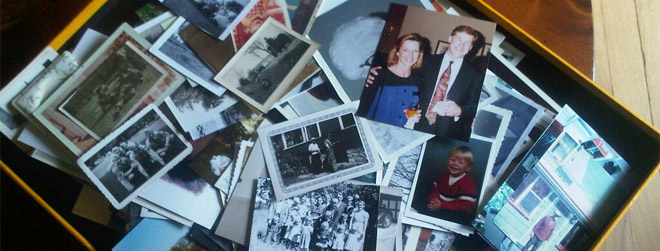
Many of us have that big box full of old photos, slides and negatives just sitting around collecting dust. Just thinking about digitizing and organizing them can be painful and makes it easy for us to procrastinate! At the same time, most don’t really want to be memory hoarders, especially when they remain in a format that few people still have access to. However, with some modern equipment, software and a little bit of patience, you can organize every piece of digital media you own, and make them accessible from anywhere!

Digitizing Your Images

At first, you may just want to scan all of your media, whether that be video tapes, photos, audio or film, in one go and put everything onto hard drives or DVDs. If you don’t organize anything prior, this method can be tough because then you’d essentially be going from a box of thousands of random photos to a hard drive with thousands of random images and video. If done correctly, this can be a good way to do it, but it requires that you organize everything you have before-hand, so you know where it goes once it’s digitized.

If the amount of time you can dedicate to this project is limited, it’s recommended that you do try to focus on one media type such as photo scanning before you transfer everything you have at once, which can be chaotic and overwhelming. Most people choose to organize their photos chronologically, or by categories. With very large photo collections, most people opt for categories or a combination of categories with dates. With photos, it’s pretty easy to organize over other types of media because most of the time you can visually tell how old the photos are, or what event the photo is from to make categorizing them much easier.

If you have multiple different types of media (videos, audio, film, plus images) you need converted, or if you don’t own any equipment to digitize your media, it’s highly recommended you choose a local company in your area that handles video to DVD and photo scanning services. Typically, these companies will use better equipment than most people can get their hands on, plus the in-house technicians are highly trained in transferring media. In addition, they will usually keep your photos organized in the same way you brought them in, so if you organize them beforehand they will be digitally organized in the same way on your hard drive or DVD.

Organizing Your Images
Once your collection of photos has been scanned and digitized on your computer, it’s now time to try to sort through them to make cataloging and future searches much easier. This is especially important if you did not opt to organize everything beforehand. Organizing them provides a few key benefits such as instead of looking through one giant directory of images, you can segment them into smaller batches separated by common factors such as date, who the people are, or where the photo was originally taken.

Once you have a clear idea of how you want your images separated, the next step is to get hold of a nice image viewing and browsing program to make the sorting job much easier.

Pro-tip: Don’t feel that your are forced into using your digital camera or camcorders default software. Often times, pre-bundled software from the manufacturer only works as good as it needs to, and lacks many of the sophisticated functions found in better, free software.

Image Browsing Software

Picasa
Picasa is a simple, yet effective photo manager. Originally developed by Idealab in 2002, it was purchased shortly after by Google in 2004. Since then, it’s grown as a premier photo manager with a large user base. With Picasa, it’s possible to organize and search for your photos in a variety of different ways. For starters, Picasa utilizes a folder manager, which allows you to import photos from all around your computer into Picasa, without moving the original photos out of their existing directories. You can of course do the standard such as name the photos individually, place them into folders, as well as new ways of photo sorting such as facial recognition, keyword tags, geotagging, and photo collections. Picasa is free download as well, making it a top choice for many people worldwide. Picasa also has a built in image editor called Pic Nic, which will allow you to make edits to your scanned photos for common ailments such as color adjustments, contrast, red-eye fix, and cropping.

However, read the fine print on the agreement you sign with Picasa/Google. It gives Google the rights to all of the photos you put on the site, for their unrestricted use. If this is something you don’t agree to, there are a couple of other great alternatives.

XNView
Another free photo browser. It’s also open-source and free to download. Supports over 400 different image types.

Irfanview
A popular, free image browser. IrfanView seeks to create unique, new and interesting features, unlike some other graphic viewers, whose whole “creativity” is based on feature cloning, stealing of ideas and whole dialogs from ACDSee and/or IrfanView! (for example: XnView has been stealing/cloning features and whole dialogs from IrfanView, for 10+ years).

Now, once you choose your program and have all of your images loaded in front of you, you can begin sorting. You’ll have to refer to whatever program you chose’s documentation for the nitty-gritty stuff, but the basic functions should be pretty easy to catch on to. Mostly you’ll be dragging and dropping images into new folders that you create. You can also tag photos to show up for certain keywords. Picasa even offers facial recognition technology which will tag people in your photos if it recognizes them through your other photos.

How to Create a Family Facebook Group and Share Media

Did you know you can learn about your extended family simply through social media?

Social media has been growing steadily in recent years with now more people online than ever before, sharing photos and other media with each other’s friends and family. It allows people to connect with people far, far away instantly and share recent and old memories in the blink of an eye. It has allowed friends and family to stay close, despite being in different geographic areas of the world. It’s a great tool for sharing data that people do not have access to such as images that had been created through our photo scanning or video to DVD processes.

Social sharing sites like Facebook has opened a new door of technology allowing everyone with internet access communication with anyone in the world in seconds. Facebook also has some great built-in functionality which make it even easier for larger groups of people to stay in touch, and regularly share new ideas and media with each other. You can accomplish this by using Facebook Groups. By creating a group, you can invite your friends, family, coworkers or whoever else in the world you’d like to include. When the group has been formed, and members start to join, it acts as a sort of digital hangout spot where all members can post messages, share photos and video and send event invites.

To set up your own group for your family or friends, first log into your Facebook account. If you are not yet a Facebook member, you can create a free account at https://www.facebook.com pretty quickly. Once logged in, look on the left navigational sidebar, and look for the “Groups” heading. Just under this, click the “Create Group” button.

You will now be presented with your initial setup options. Here you can pick a name for your group, and add new members. You can also choose your group’s privacy level ranging from Open (Anyone on the internet can join and post), Closed (Anyone on the internet can read, but only members can post) and Secret (Group is hidden to all but members). You must add at least one other group member before you can create the group. When finished, click Create.

To keep your group’s privacy, we recommend setting it up as a secret group, which will prevent strangers from seeing or reading your group’s content. However, public groups are also extremely popular and allow people with similar interests a place to chat and explore new ideas.

The next step will have you pick a small icon to represent your group, although it is not necessary to complete the creation process.

Once finished, go back to your sidebar navigational menu, and your new group should appear under the Groups heading. You’re now ready to start inviting your family and start sharing your old media!

DIY Movie Projector, Home-made Projector Using Old Parts

Check out the video below for how to make a custom home movie projector yourself from spare parts around the house! Hook it up to any video source and you can watch your Video to DVD movies on a big screen!

Create a Slideshow Locally in Denver, Custom Event Videos and Montage

Do you need to create a slideshow movie or a custom video for your next event? DVD Your Memories can help, and we’re right here in Denver, Colorado.

Slideshows are a great way to add something extra to your event or gathering. Great slide shows will help keep your guests entertained with images, video or film from the past as they listen to your selected music to go along with it. Slideshows are nothing new for most of us as they were first popularized decades ago by using old 35mm slides on a carousel, and then displaying them all through a projector to your audience. Many times, music was timed and played with a standalone recorder next to the screen along with the slides for added drama. Today, technology has progressed to the point that we can actually create slideshows digitally from our computers.

Slideshows are great to use with old photographs and video, to show the audience some things they may have never seen before. At DVD Your Memories, we can help you create a slideshow ranging from a basic slideshow with just a few images to an elaborate production full of music, video and modern effects. If you choose to sit with our in-house editor, we can even add professional quality voice-overs to any part of your video. We’ll even send you a preview video to make sure everything is perfect before the final rendering.

Need help with a professional slideshow? Check out our local slideshow services below!

Slideshows Denver
Custom Slideshows Denver
High Definition Slideshows Denver

1 14 15 16 17 18 44