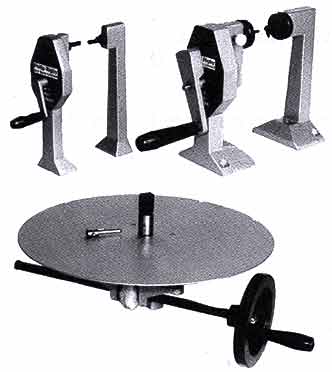
Before film is viewed, or ready to transfer to DVD, it must first be properly cleaned and inspected for breaks in the film. If no film cleaning is done, the film will appear dark, grainy, and often times much harder to watch. To properly clean and lubricate your film, you’re going to want to get some manual 8mm film rewinders. These can be mounted to ply wood, or other wood base to help with your project. In addition to the hand cranks, you’ll also need to obtain a spare reel, or tak-eup reel. The photo below shows a typical pair of film rewinders. If you’re a hardcore DIYer, you could probably fashion something similar out of parts you find around the house.
The materials you’ll need to clean the film are some silicon cleaning cloth, and some film cleaning solution, which can be purchased from our friends at urbanskifilm.
Once all the pieces are gathered, and assembled, it’s time to begin inspecting and cleaning your film. Make sure you’re hand cranks are mounted properly.
1. Use the right winder as the take-up reel Load the film into the reels so that the emulsion or dull side is facing up and the sprocket holes should face you.
2. Use a small amount of cleaning solution on the silicon cleaning cloth.
3. Fold the cloth over the film and pinch it between your fingers.
4. Slowly load the film onto the take-up making sure some gentle pressure is applied to the cleaning cloth and the film. Change cloth frequently as it will gather lots of dirt.
5. Repeat the process and load the film back onto the original reel.
6. Repeat if film isn’t cleaned entirely.
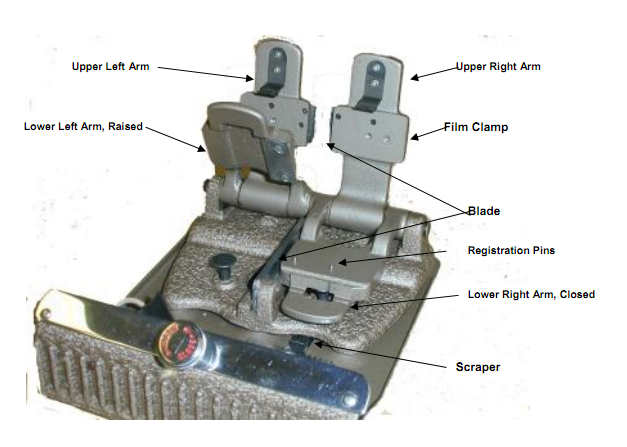
During this film cleaning process, it’s common for splices to break which puts a halt into your efforts. When a break happens, you’ll need to splice them back to gether. If at all possible, you want to avoid using tape to splice the film back together. For best results you’ll want to use a splicing kit, and some film cement. Use the picture below to see what the splicer looks like. The splicing process isn’t complicated, but needs to be pretty precise.
1. Place the film on the splicer, spocket holes facing you and line them up in the pins.
2. Raise the lower and upper left arm and upper right arm. Place film on the right of the registration pins, dull side up, and clamp it in place with the upper right arm.
3. Press the left arm down, which cuts the film. Then raise the upper and lower right arm.
4. Place the film to be spliced on the registration pins on the lower left arm, dull side up, and clamp it down with the left arm. Then cut the film using the right arm.
5. Now dip one end of a small cloth into some water, and moisten the film protruding beyond the left arm. Scrape all of the emulsion from this portion using a scraping tool. Wipe away all emulsion with a cloth. Make sure surface is dry, and apply small amount of film cement.
6. Bring right arm down over the cemented portion and wait at least one minute for the cement to dry. Lift all arms and remove film and inspect to make sure splice is complete.a
This is obviously a lot of work and setup involved, but film cleaning is an absolute must for the ideal film conversion. For small amounts of film, we recommend simply taking it in for a 8mm to DVD transfer or hard drive conversion. Prior to each film to DVD transfer, we clean every inch of your film and make sure it is spliced together neatly.


Any idea where I can obtain some film rewinder hand cranks?