
Improving Quality of VHS to Digital Transfers
Why Does Your Tape Look Worse?
The vast majority of video tapes simply don’t look as good as when you either purchased or recorded on to them 20 years ago. Color degradation, flickering, tracking issues, and other problems simply tend to happen when tapes get older. Sun damage, water damage, normal wear and tear, and many other things can create problems on your VHS Tape. If you’re interested in transferring your VHS to digital, this is the guide for you. Often, the problems with old tapes are so bad they’ll distract your from the video itself. However, it is still possible to improve the quality of those old tapes.
Clean Your Tape!
The most important thing to do to improve capture quality is to clean the actual tape itself. We’ve written a fairly exhaustive guide here. No amount of fiddling with your VCR is going to make a dirty tape not look dirty. Clean tapes make for the best transfers, and we make sure to clean dirty tapes before we transfer them at DVD Your Memories.
What You’ll Need for Transfer
If you’re transferring the tapes yourself, you need to fix as many problems as you can while you capture. It’s far simpler to fix problems while capturing than while editing. It’ll save you many hours and probably some money on editing software. To get the best capture possible: invest in a good, reliable VCR, a color correction unit, and a time-based corrector.
A Good, Reliable VCR
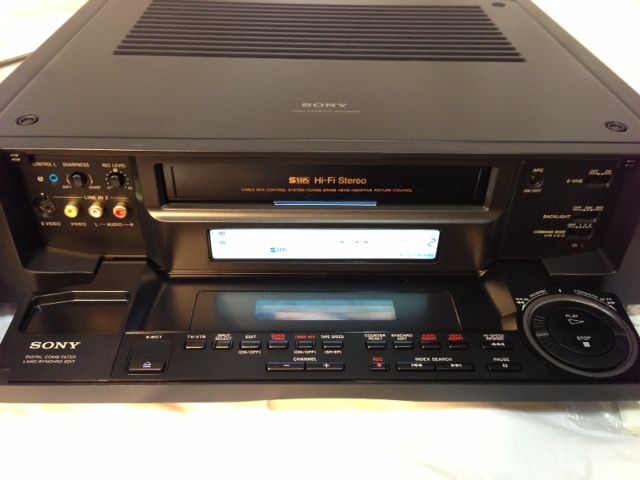
We recommend investing in a VCR from either the 1980s or 1990s. At DVD Your Memories we’ve transferred hundreds of thousands of video tapes, and we’ve found that older VCRs perform better. Maybe they were just built sturdier back then. Since production of VCRs has been discontinued, 2025 is unlikely to bring us great new models of VCR. Not all VCRs from the 80s and 90s are equal, though, so we recommend a Sony, JVC, or Panasonic brand VCR. You’ll have to buy a used model, so if the picture on the one you buy isn’t great, make sure to clean it using our guide.
Color Correction Unit
Now you’ve got clean tapes, and a clean sturdy VCR. The next thing you need is a video color correction unit. Color correction units receive the video signal from your VCR and output a color-corrected signal back to your TV. It allows you to finely tune the color of your video by letting you offset certain colors to gain a good color scheme. It uses a digital RGB scale to achieve that. That helps immensely when the color on your VHS degrades into being too “red” for your taste. If you want to save lots of time editing, make sure to adjust your unit before every tape. Your tapes likely have different kinds of damage and aging, so you want to tailor your transfer per tape. Color correction units are easy to adjust, so it won’t be a problem, even if you want to go scene-by-scene.
Time-Based Corrector
Time-Based Correction (TBC) helps keep your digital transfer consistent. Different formats of tapes (VHS, PAL, Betamax, SECAM, etc) have different specifications as to how they should play. Lines and frames per second should be consistent for all parts of your tape, and to the standard of your format. VCRs on the cheaper side sometimes have trouble replicating the exact time standard of the tape being played in it. Incidentally, cleaning your tape and VCR greatly help to reduce that error. Fixing time errors is also what a Time-Based Corrector is for. If your VHS tapes have tearing, red-blue fuzz, or a litany of other issues listed here, you need a TBC. A TBC corrects the issues in real time, repairs the picture it receives, and sends the repaired picture for duplication. No matter whether you’re digitizing your tape or duplicating it, you need a TBC.
Other Issues
Read this if you’ve cleaned your tape and your VCR, invested in quality hardware, and the picture still isn’t up to scratch. Firstly, try playing your tape on a different VCR. Different machines will produce different results, especially on damaged tapes. There’s more art than science to finding the perfect VCR for digitizing your tape sometimes. Make sure you really are using all the hardware listed above: TBCs in particular will help wonderfully in reducing picture tear, fuzz, and other issues.
Editing Your Video
Now you’ve captured the VHS to your computer, the last thing you need to do is edit your video. You’ll want to use high quality video editing software for this – at DVD Your Memories, we use Sony Vegas. Final Cut Pro is also good software for the Mac, and you can get a 90-Day Free Trial, which ought to be plenty of time to edit all your tapes. You want the best presentation possible, so make sure you take time over your editing.
Having a Professional Do It
Maybe you don’t have the time to do all the editing, or you’ve just got the one tape and can’t justify buying a bunch of hardware to transfer only one tape. In that case, we recommend using a professional service in your area. For legacy media transfers, going local is the right way to go. In a world increasingly full of mail-in transfer companies, local ones are harder to find – but there’s almost certainly one in your area. If you’re in the Southern California area, we’ve got four locations all over Southern California.




Thanks so much for the tips ! I found a VHS video from 1992 and it is OLD of my kids as small children. its the ONLY video of them ever ! It has tracking problem watching it and I want to get the best I can get transferring and editing it.