Transferring learning how to rip a CD to your computer has a couple great advantages. First, you can consolidate your whole collection in one location, or even place it on a hard drive for safe keeping. Once it’s on the computer, organizing everything is a breeze. You can use a music organizing program such as iTunes, or just organize them yourself by placing them into folders that you create. In addition, you can also take your music with you on the go by placing the music files on your portable cell phone or music player.
If you’re looking for a quick way to rip a CD to your computer, it might just be easier than you think, and can often be accomplished without puchasing any equipment! If your computer has windows media player installed, you shouldn’t have any problems creating your music files.
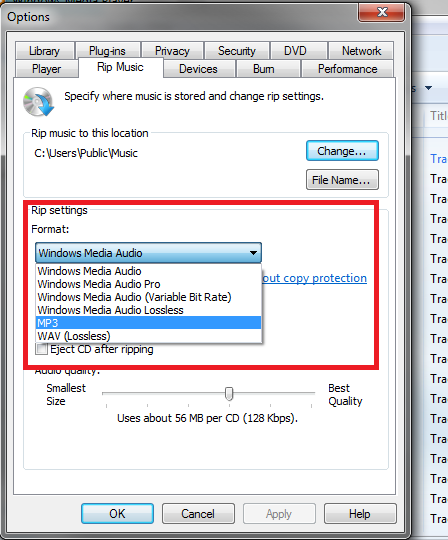
To rip a CD, you need to make sure you have the latest version of Windows Media Player, a music CD, and a CD-ROM drive. For this example I am using Windows Media Player 12 on Windows 7. The Windows Media Player software typically comes bundled with Windows when it is installed on your computer. Once you have determined that Windows Media Player is installed, place the CD you’d like to be ripped into your CD-Rom drive. Depending on your settings, it might even start to play right off the bat, if not, go ahead and open windows media player and go to the options by clicking organize->options at the top toolbar. Once you open the options window, select the “Rip Music” tab at the top and you should then see the screen below.
Feel free to tweak with the options here, as there are a few things to play around with. You can adjust the directory to where the resulting audio files will be placed, you can select what format you’d like them in, and finally you can adjust the ouput quality of the files. Choosing higher bitrate will improve the quality at the expense of large file sizes. If compression is your goal, you will definitely want to adjust the quality slider to choose the appropriate size for your project.
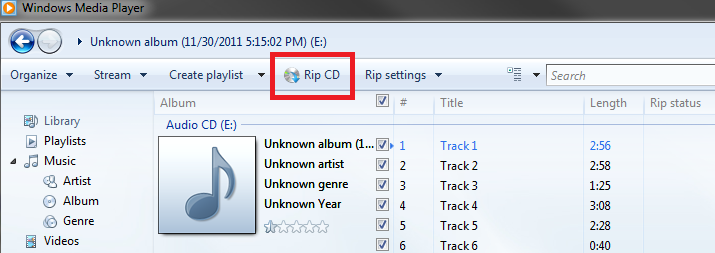
Once everything is selected to your specifications, press apply, then hit OK. At the main window, all you need to now do is click the button that says “Rip CD”.
The audio files will be placed in the directory you specified in the options menu. That’s it! You can now use this method to rip a CD to your compter or music player. This process will work for all audio CDs including ones you receive from cassette to CD, or LP to CD transfers.


